JMicron RAID Manager software not compatible with OS X 10.15 (Catalina) [#10222019]
The current version of JMicron RAID Manager software is 32bit. It is not compatible with OS X 10.15 (Catalina) because the OS requires all apps to be 64bit.
It is compatible with OS X 10.14 and older version.
Will your M.2 NVMe product support NVMe Module with B+M Key (PCIe Gen 3 x2)? [#12232019]
Yes, All our M.2 NVMe Enclosures supports NVMe Module both M Key (PCIe Gen3 x4) or B+M Key (PCIe Gen3 x2). Example of NVMe with B+M Key is the WD Blue SN500 NVMe SSD, Part# WDS250G1B0C, WDS500G1B0C.
Please do not get confuse M.2 NVMe B+M Key with M.2 SSD B+M Key. M.2 SSD Module will not function in the NVMe enclosure or on the NVMe add-on card.
Yes, All our M.2 NVMe Add-on Card supports NVMe Module both M Key (PCIe Gen3 x4) or B+M Key (PCIe Gen3 x2) too.
If you are not sure write to support@vantecusa.com for assistance.
Will the NST-271C31-BK support TRIM? [02072020]
Yes, the NST-271C31-BK will support TRIM.
If you have an older version that will not support TRIM, please use this link to update the firmware.
https://www.vantecusa.com/CKEdit/files/NST-271C31-BK_TRIM.zip
Download, unzip and follow the pdf instruction to flash the firmware.
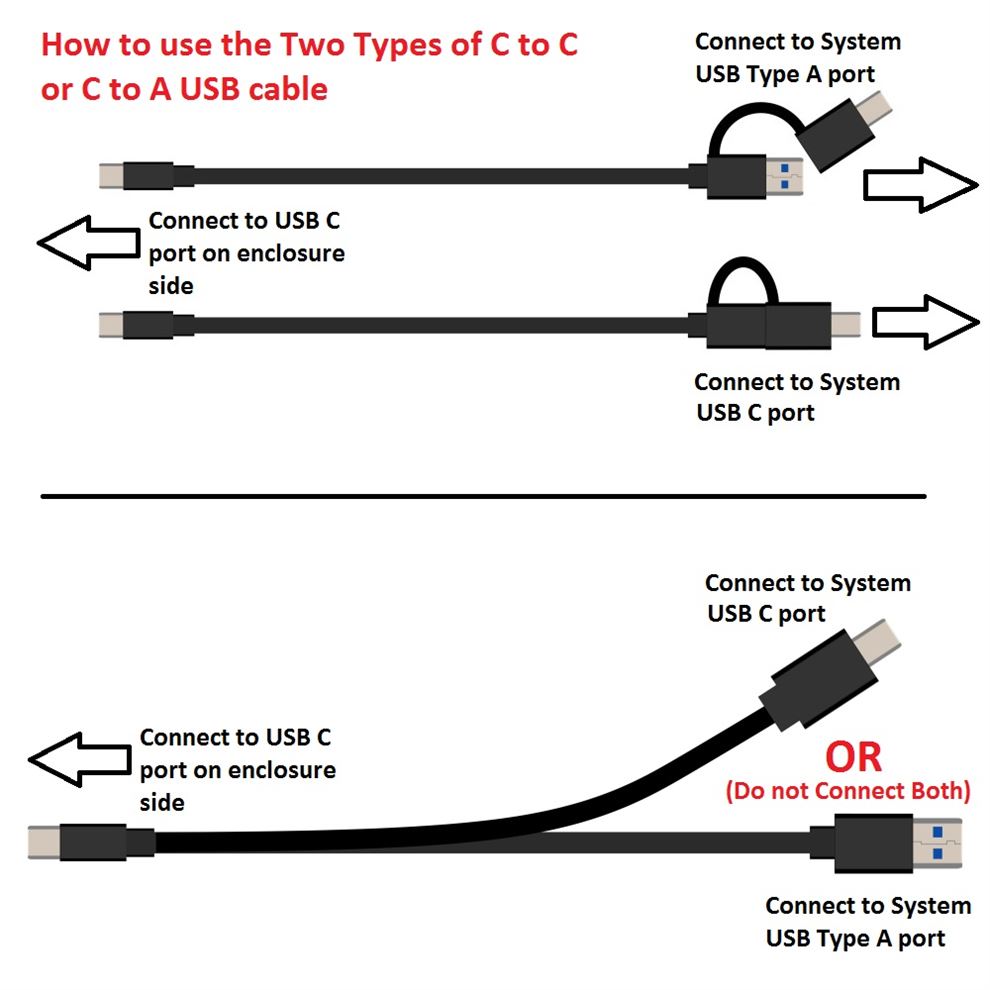
How to use C to C or C to A USB cable on some enclosures that comes with these cable [#03042020]
Some enclosures you purchase may come with the following USB cable shown below or Dual cable.
For USB cable shown below, the right way to connect the cable is to plug the single USB C to the enclosure first
and the other end to your system USB port shown. Do not reverse the connection, it may not work.
For Dual cable (two cable, C to C and C to A) the right way to connect the cable is to see what type or port is available
on your system and use the C to C or C to A. First plug the single USB C to the enclosure and the other end to your system USB port
Firmware update for the OLDER NST-205C3-SG (NON-TOOLESS ONLY) and NST-206C3-SG (NON-TOOLESS ONLY) [#03062020]
There is a Firmware update for the OLDER NST-205C3-SG (NON-TOOLESS ONLY) OR NST-206C3-SG (NON-TOOLESS ONLY).
This firmware update will not affect the module and can be performed with or without the NVMe module. This firmware is for correcting issues with WD NVMe with 2 lanes, if you are not using 2 lanes module, you do not need this firmware.
This firmware is only for the very early version of the enclosure. If you just purchase a new enclosure, you do not need this firmware.
Just plug the enclosure into the System USB port and run the firmware update software. If your enclosure firmware is current, it will not change. If your enclosure firmware is not current, it will update to the latest.
Here is the link: https://www.vantecusa.com/CKEdit/files/NST-205C3_206C3_FW_UpdateUtility_v133_01_00_02_03_06.zip
For further help, please write to VantecUSA support, you can reach them at support@vantecusa.com
How to use the Write protect switch on NST-203C3-SV, NST-204C3-SV, NST-205C3-SG, NST-206C3-SG and NST-207C3-RBG [#06012020]
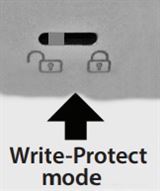
The write-protect switch on these enclosures is designed to block any OS-level file access.
The switch needs to be set first before it is connected to the USB port.
To change the storage to read-only, change the switch to lock position and plug the USB to your system like you normally do and you will see the OS view the files as read-only.
To change from lock to unlock or vise-versa, do a USB “safe to remove” first, unplug the device from the USB port, change the switch setting, and plug it back into your system.
It is not designed to change the mode while the storage is connected to the system. Changing mode while connected may produce an undesirable result.
Common Question for NST536S3-BK / NST-540S3-BK [#02012002]
Why is my Optical Drive Enclosure not powering up?
This is one of the most common questions, this enclosure is designed to save energy, when it detects no connection to a working system, it will go into a sleep mode and not power ON. The right way to use this enclosure is to make sure all the necessary cables are connected AND your system is powered ON before turning ON the enclosure.
If you just install an Optical Drive into the DX enclosure and try powering ON without connecting to a working computer, it will stay in sleep mode and not wake up.
Will the NST-540S3-BK / NST-536S3-BK works with any 5.25” Optical Drive?
Yes, as long as the measurement fit and the optical do not consume too much power. This enclosure is designed to fit a 5.25” standard optical drive with a depth of 185mm. The power requirement of your optical drive is also important, if your optical drive (power requirement info on your optical drive label) power requirement exceeds the capability of our provided ac adapter, your optical drive may not function correctly.
Do you need any drivers to install?
No, drivers are not required, it is plug_and_play. Once installed and powered ON, the system will see the USB optical drive instantly.
What type of optical drive do I need?
This enclosure is using a SATA interface inside to connect to a SATA optical drive. It will work with any standard SATA optical drive. It will not work with an IDE optical drive.
I have an optical drive that requires more power than what a normal optical drive uses, what can I do to make it work?
You just need to get a bigger ac adapter. Any bigger ac adapter for this enclosure MUST be 12VDC, but the current (Amp) can be from 3A to 5A is fine. Another important thing is the plug size. It is using a single-pin plug. See dimension below with a picture showing the plug size.
Do I need any software for burning CD/DVD/Blu-ray with my optical drive in this enclosure?
No, you do not need any additional software, your OS built-in software will enable you to burn CD/DVD/Blu-ray, but if you prefer, you may use other 3rd parties Optical drive software to do more.
Can I connect this USB 3.0 optical drive to a USB 2.0 or faster USB 3.1/3.2 ports?
Yes, if you are using USB 2.0, it will be slower doing read, but it may not be able to write correctly due to the slow USB 2.0 speed. If you are using a faster USB 3.1/3.2 port, the enclosure will still function at USB 3.0 speed and perform correctly and reading/writing.
My new system does not have a USB Type-A port, it is all USB C, can I still use this enclosure?
Yes, you just need a USB C to USB Type-A adapter. The adapter should have a USB female Type-A on one side and a USB C male on the other end to plug into your system.
Will this enclosure fit an optical drive from my laptop?
Sorry, it will not fit. The laptop optical drive comes in 2 sizes, they are slim in design and it is only 9.5mm or 12.7mm in thickness, the interface is different, they are using a Slim SATA interface that will not fit into a standard SATA interface.
I am trying to play a Blu-ray movie disc on my Blu-ray optical drive mounted in the DX/DX2 enclosure and it is not working, why?
Blu-ray movie may be encoded using special copy protection, follow the instruction that comes with the Blu-ray disk to install the necessary software/player before you can watch the movie. This has nothing to do with our enclosure, it is the requirement of the Blu-ray optical drive and the movie producer.
I lost my USB 3.0 cable that comes with this NST-540S3-BK / NST-536S3-BK, where can I get a replacement cable?
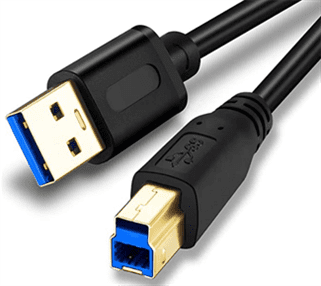
This is using a common USB 3.0 cable with Type A on one side (to plug into your system) and type B on the other to the enclosure. Just search google (search USB 3.0 Type-A to B cable) for them or the local store should have them. This is a standard USB cable. This is how it looks. Generally, it is 3ft or shorter is good.
I lost my ac adapter for this DX / DX2 enclosure, what size of an ac adapter do I need?
The DX enclosure comes with an 12VDC, 2A ac adapter. The DX2 enclosure comes with 12VDC, 3A ac adapter. if you need to purchase a replacement ac adapter, you can just search online (google search) for them or the local store should have them too. Beside the power requirement of the ac adapter, you also need to know the plug size to fit into the DX /DX2 enclosure. Not all ac adapter are made the same, I would suggest a slightly bigger ac adapter. Any bigger ac adapter for this enclosure MUST be 12VDC, but the current (Amp) can be from 3A to 5A is fine. This is using a single pin plug.

UGT-FW210 Power connector usage [#08122024]
The design of any Firewire PCIe card can support different types of devices. Some devices require a lot more power from the Firewire port, like a Firewire Storage device that is bus-powered.
According to the Firewire specs, the Firewire port requires 8 to 30 volts under IEEE 1394 specs, but the most common are 12 volts. The majority of the devices MAY be self-powered and do not require the Firewire port power to drive it.
We provide the cable just in case your PCIe x1 slot is not providing enough power for your ports.
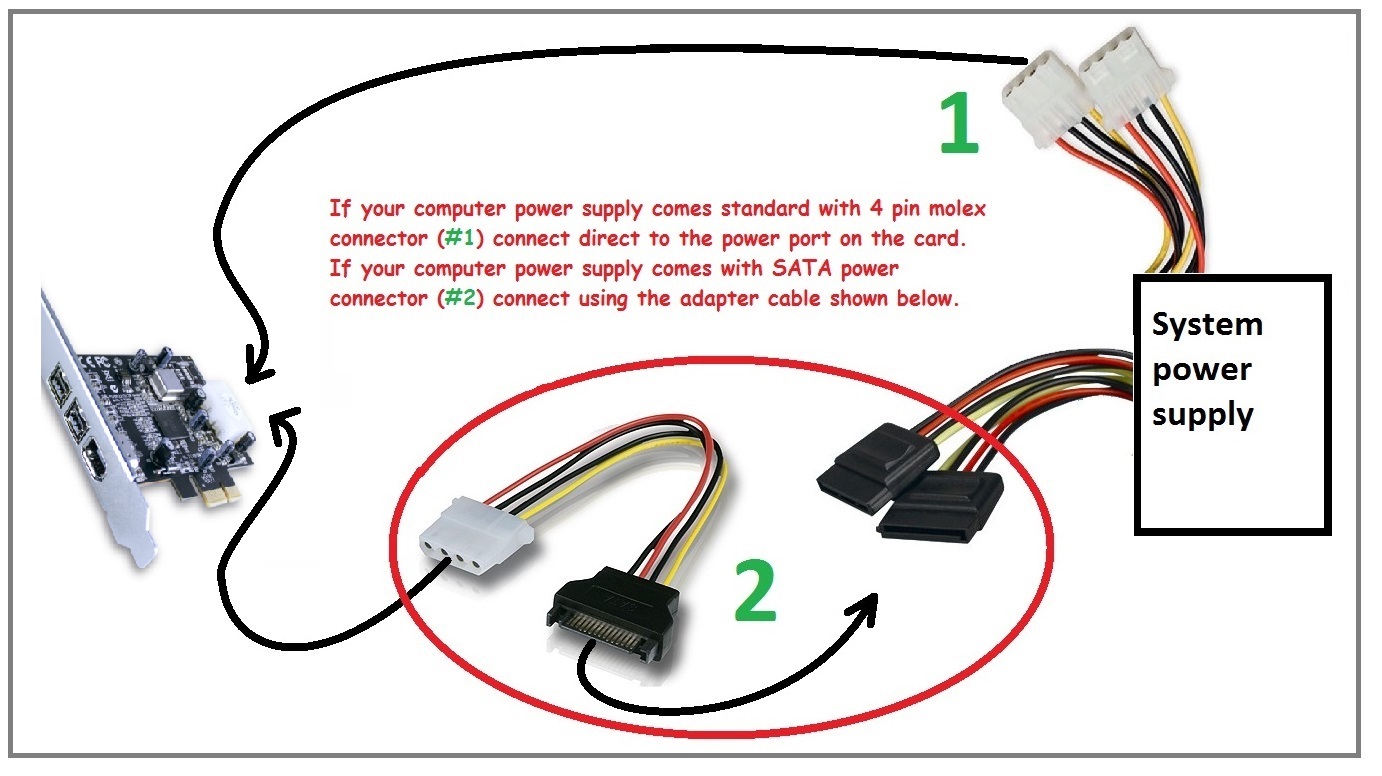
This cable is designed to supplement power via the system power supply to the card for your firewire ports.
Depending on your system power supply provided power connectors, some may provide LP4 power connectors or SATA power connectors.
If your power supply provides an LP4 connector (#1 below), you can connect directly to the card. If your power supply provides a SATA power connector (#2 below), use the cable as shown.
Latest Revised Toolless NST-205C3-SG design function with Samsung 980 Pro M.2 NVMe minor changes [#07312023]
The latest Revised Toolless version of this enclosure was shipped with the latest firmware.
It was reported that it is not working with Samsung 980 Pro M.2 NVMe. There is nothing wrong with the enclosure, the firmware on the Samsung 980 Pro M.2 NVMe needs to be updated to function with this enclosure.
Please download the latest firmware from the Samsung website to update your 980 Pro before using this enclosure.
Please contact the Samsung website for further assistance.
If you need further help concerning this enclosure, please write to VantecUSA support, you can reach them at support@vantecusa.com
UGT-ST644R latest Marvell MSU RAID tool [#092822022]
Here is the latest Marvell MSU to correct the web browser security issue.
https://drive.google.com/file/d/175kiQ0VVWcPtwBvAyL5oXrqSxb4Iy49V/view?usp=sharing
Why after cloning my SATA boot device, to a new M.2 NVMe drive, it will not boot and error out? [#05272022]
Why after cloning my SATA boot device, to a new M.2 NVMe drive, it will not boot and error out?
This is a common problem with cloning when you clone dissimilar interfaces like SATA to NVMe (PCIe). The SATA drive is managed by the SATA controller and M.2 NVMe is managed by the PCIe controller. These two dissimilar controller uses different OS drivers. After you clone the SATA drive to your M.2 NVMe (PCIe), the OS on your boot drive will try to boot via the SATA on an NVMe controller. This will often give you an error or a blue screen or hang during boot.
As you can see, it is not a problem with the cloning process or the cloning device. It is how the OS interprets the boot process and boots from the right controller.
Here is how to get around this common problem.
The process is simple, all you need to do is to boot your OS into safe mode. Safe mode uses a generic boot device without any reference to SATA or NVMe, it will boot correctly and prepare the OS to boot using the NVMe (PCIe) on your next boot. Once that is done, it will remember to boot correctly for the rest of the time.
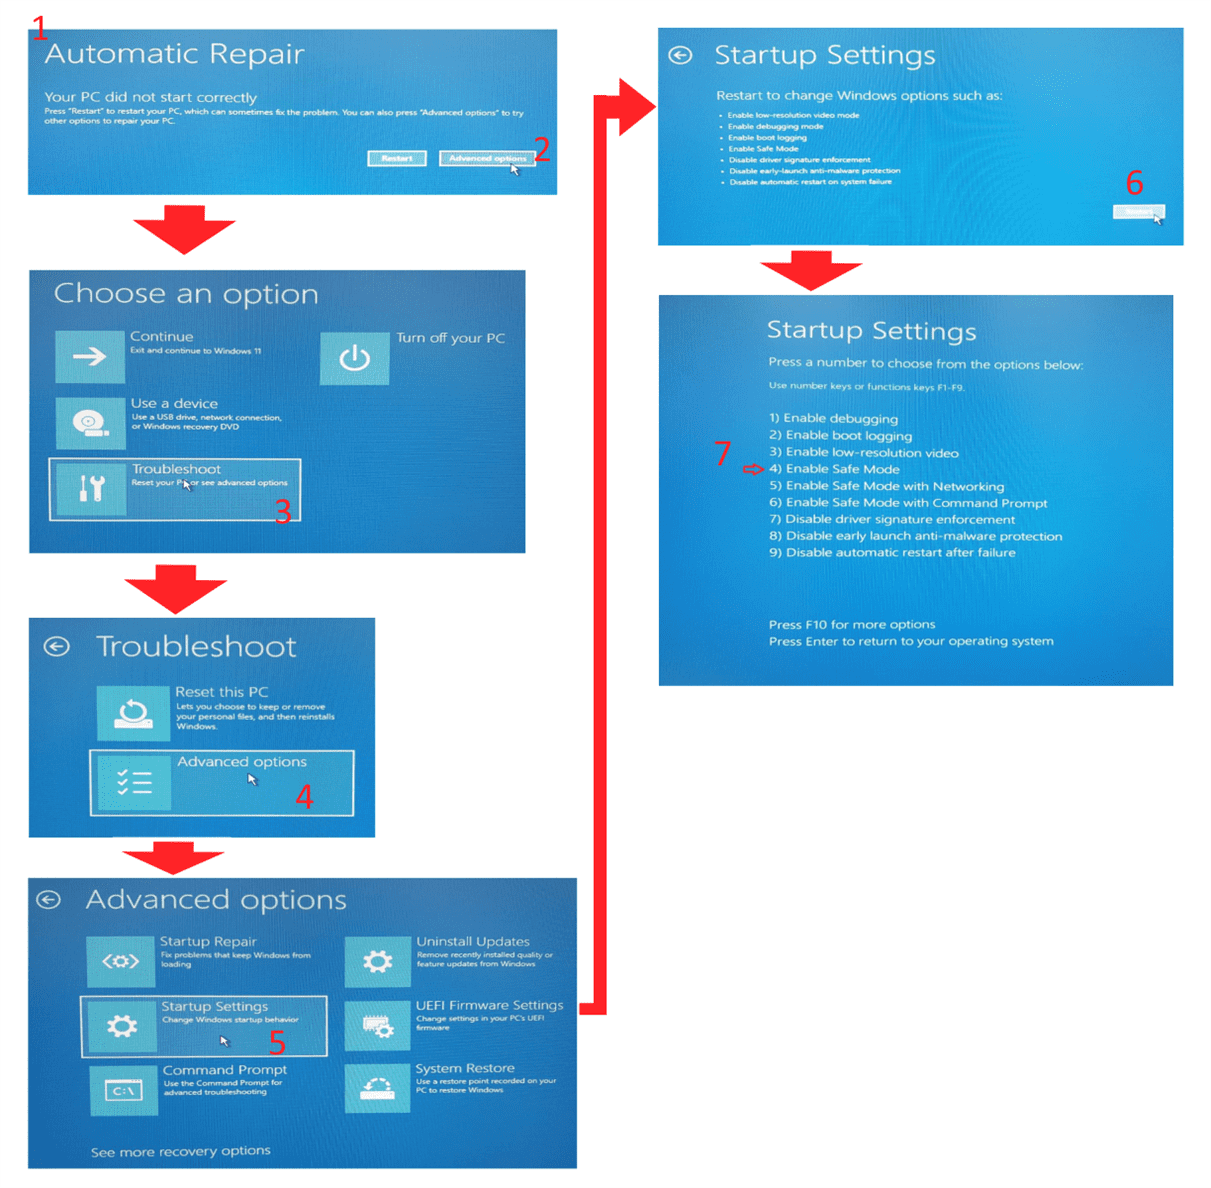
Here is the step by step to correct the problem (picture below follow the steps listed here):
1) During the initial boot, the OS will report an error message and enter into the “Automatic Repair” Process.
2) Choose “Advanced Options”
3) Choose “Troubleshoot”
4) Choose “Advanced Options”
5) Choose “Startup Settings”
6) In this Startup Settings, click restart.
7) In the Startup Settings, you will be given a selection to press a number to choose the option. Press “4” to select Enable Safe Mode. The PC will restart into Safe Mode. Your screen will show a normal Desktop with Safe Mode showing on 4 corners.
8) You may notice your system runs slower in safe mode, this is normal. Now restart your computer again. It will restart in normal mode and you are done.
VantecUSA support is available via email or phone (during normal business hours, PST – California, Mon – Fri 9 am - 6 pm).
You can reach them easily via VantecUSA.com website contact form OR email support@vantecusa.com OR phone at 510 668 0368 and ask for support.
Common questions about DX2 Optical Drive Enclosure (NST-540S3-BK) [#03242022]
Here are some common questions about this Optical Drive Enclosure (NST-540S3-BK)
1) After installing my optical drive into the enclosure AND I DID NOT connect to a computer, can I test to see if the unit is working?
You can see your optical drive LED will briefly come ON and then OFF. You can eject the tray to open and close.
2) Once it is connected to my WORKING computer via USB, connect the power and turn ON the enclosure what will happen?
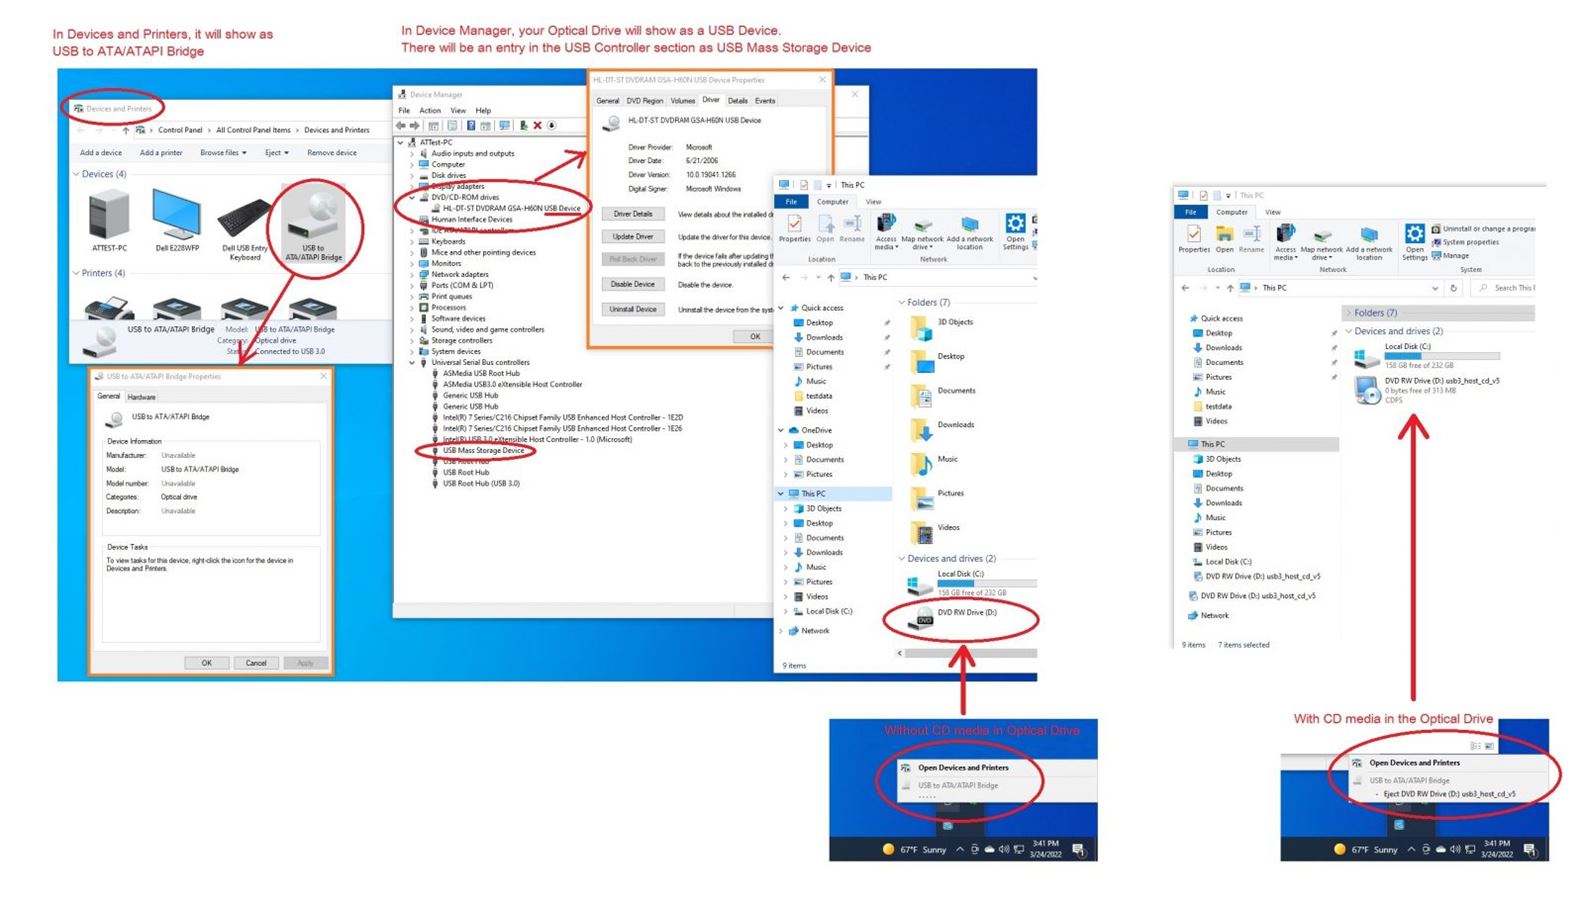
If you are using Windows 10, your system will see your optical drive as a USB storage device. See attached picture.
If you are using Windows 10, AND you have CD media in your optical drive it will show within Windows Explorer under Device and Drives as an optical drive with a media and drive letter assigned to it. On the TaskBar (bottom right) it will list as an Ejectable USB device.
3) What happens when my system goes to sleep mode?
When that happens, the optical enclosure will also put the optical drive to sleep.
4) There is no LED, how can I know if the enclosure is working?
The NST-540S3-BK serves as a USB enclosure for your optical drive, any LED activity on your optical drive will serve as the LED for the whole unit. The LED on your optical drive will function just like when your optical drive is installed inside your desktop computer via the internal SATA port. If your optical drive is working, the enclosure will too.
5) How much power is the enclosure with my optical drive using when it is in sleep mode?
We test using a Watt meter and it shows as less than 2 Watts during sleep mode with the enclosure and a common Optical drive.
6) Can I use a longer USB cable and Is this cable a USB standard cable?
It is not a good idea to use a longer cable, USB 3.0 cables are very susceptible to signal strength loss and interference. The USB cable that we provided is good, Yes, it is a standard USB 3.0 cable with Type A to Type B.
7) Do you have the Specs of the ac adapter, USB cable length, and what depth of my optical drive can I put into the unit.
Fit Optical Drive Max Depth: 7.2 inches / 185 mm; AC Adapter: Universal Switching AC adapter, 12VDC/3A, center pin positive, outer diameter: 5.45mm, inner diameter: 1.75mm, length: 10mm; USB Cable: USB 3.0 Type A to Type B cable, length 100 cm
Sometime problems may occur during first installation or use, we at VantecUSA like to help you get it working to resolve the problem. We have a team of support staff that is here to help you. Please write to us first before you return the product back to the place of purchase. We are committed to help you get the product setup and working correctly. You can reach us via email at support@vantecusa.com. We will reply to you very quickly to assist you.
Firmware Update for NST-211C3-RGB [#03142022]
Here is the link to firmware files.
Download, unzip to a folder and follow the steps in the provided instruction.
https://www.vantecusa.com/CKEdit/files/NST-211C3-RGB_FirmwareUpdate12912011122_RTL9210Bx.zip
Pair a Bluetooth Device in Windows [#10152021]
Pair a Bluetooth device in Windows 11/10/8.1/7
You can pair all kinds of Bluetooth devices with your PC—including keyboards, mice, phones, speakers, and a whole lot more. To do this, your PC needs to have Bluetooth. Some PCs, such as laptops and tablets, have Bluetooth built-in. If your PC doesn’t, you can plug this Vantec B-190 USB Bluetooth adapter into the USB port on your PC to get it started.
Windows 11
Before you start, make sure that the Vantec B-190 USB Bluetooth adapter is plugged into a USB port on your PC.
Turn on Bluetooth
In Settings
Select Start > Settings > Bluetooth & devices, and then turn on Bluetooth.
In quick settings
To find the quick setting for Bluetooth, select the Network icon next to the time and date on the right side of your taskbar. Select Bluetooth to turn it on. If it's turned on without any Bluetooth devices connected, it might appear as Not connected.
To pair a Bluetooth device
Your Bluetooth device and PC will usually automatically connect anytime the two devices are in the range of each other with Bluetooth turned on.
To pair a Bluetooth device using Swift Pair
Swift Pair in Windows 11 lets you quickly pair a supported Bluetooth device with your PC. If the Bluetooth device supports Swift Pair, you’ll receive a notification when it's nearby and you put it into pairing mode to make it discoverable.
Windows 10
Before you start, make sure that the Vantec B-190 USB Bluetooth adapter is plugged into a USB port on your PC.
Turn on Bluetooth
In Settings
Select Start > Settings > Devices > Bluetooth & other devices, and turn on Bluetooth.
In action center
Action center can be found next to the time and date on your taskbar. On the taskbar, select action center, then select Bluetooth to turn it on. If it's turned off, it might appear as Not connected.
If you don't see Bluetooth in your action center, here's how you can change it:
To pair a Bluetooth headset, speaker, or other audio devices
To pair a Bluetooth keyboard, mouse, or other devices
To pair a Bluetooth device using Swift Pair
Swift Pair in Windows 10 lets you quickly pair a supported Bluetooth device with your PC. If the Bluetooth device supports Swift Pair, you’ll receive a notification when it's nearby and you put it into pairing mode to make it discoverable.
Windows 7
Before you start, make sure that your Windows 7 PC supports Bluetooth.
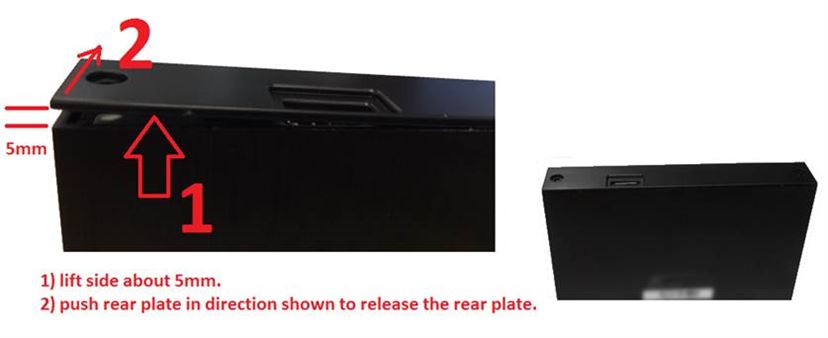
How to remove back plate on the NST-520S3-BK [08062021]
