What is the Maximum Capacity Hard Drive can I install into the enclosure or Dock and Power Requirement of the drive? [#33402]
It can vary depending on the age and type of the Enclosures.
Please READ these Limitation:
1) For 2.5" SATA drive, Maximum Capacity alone is not the only thing you have to check, the other important criteria are the thickness of the drive. If your 2.5" enclosure will only fit a drive with the thickness (or height) of 7mm drive, trying to put a 9.5mm thickness drive into the enclosure will not fit.
2) The power requirement of the drive is also very important. Most drives are designed for installing into the systems with unlimited power. If you purchase a big capacity drive with power requirements that exceed the power your USB port can provide, it will not function. This is the fault of your USB port lack of power and your power hungry drive, not the enclosure issue. The enclosure uses minimum power. Your Drive plus the enclosure MUST not exceed the power capability of your USB port.
3) Support AF or 512e drives only, do not support 4Kn drives.
Please READ these Limitation:
1) The power requirement of the drive is also very important. Most drives are designed to draw less than 13 watts per drive. The enclosure uses minimum power and the ac adapter that comes with the enclosure are designed for most standard power requirement of the drives. If you purchase drives that draw too much power (greater than 13 watts) and exceed the specifications of the enclosure ac adapter, it will not function correctly. Please check the label on the drive for the power specifications. If your drives exceeded the limitation, you may have to purchase a bigger ac adapter for your needs, please contact Vantec Support for sizing the ac adapter for your needs and to purchase optional bigger ac adapter.
2) Support AF or 512e drives only, do not support 4Kn drives.
It can vary depending on the age and type of interface of the Dock.
Docks are designed for 2.5" or 3.5" SATA drives, for current shipping docks, 2.5" SATA HDD/SSD, the capacity ranges from 100GB to 4TB, and for 3.5" SATA drive, it is 500GB to 16TB. For older Docks purchased before 2015, it may only support 2TB or less. Please write to support@vantecusa.com for further help or questions.
Please READ these Limitation:
1) The power requirement of the drive is also very important. Most drives are designed to draw less than 13 watts per drive. The dock uses minimum power and the ac adapter that comes with the dock are designed for most standard power requirement of the drives. If you purchase drives that draw too much power (greater than 13 watts) and exceed the specifications of the dock ac adapter, it will not function correctly. Please check the label on the drive for the power specifications. If your drives exceeded the limitation, you may have to purchase a bigger ac adapter for your needs, please contact Vantec Support for sizing the ac adapter for your needs and to purchase optional bigger ac adapter.
2) Support AF or 512e drives only, do not support 4Kn drives.
Clone issue with LED and not finishing clone (NST-DM12C31, NST-D258S3-BK) [#08292024]
FAQ:
Q: Hold the Clone button to wait for the Four flashing LEDs, but the Four LEDs (25%, 25%, 75%, 100%) will not flash, why?
A: The Cloning will not start because the TARGET is smaller in sectors compared to SOURCE. It is not possible to clone from a Big to a small drive.
This STANDALONE CLONING function can only clone a drive with less number of sectors to one that has more sectors.
If you need to clone from a Big SOURCE to a small TARGET, you must use the software cloning method.
Steps:
1) Connect via USB cable to your system
2) Install cloning software from the drive manufacturer
3) start the cloning software to clone from the selected SOURCE to the TARGET drive.
Q: Cloning stayed at 25%, 50%, or 75% and did not finish for many hours, why?
A: if it is stuck at 25% or 50% or 75% and does not finish, it is saying the dock encounters bad sectors on the SOURCE or TARGET drive and cannot continue.
Please check your SOURCE and TARGET drive for bad sectors. Use other drive tools to check and resolve the errors before continuing.
If it is still not possible to use STANDALONE Clone, please use the software cloning method.
Steps:
1) Connect via USB cable to your system
2) Install cloning software from the drive manufacturer
3) start the cloning software to clone from the selected SOURCE to the TARGET drive.
Why is the enclosure not powering UP my drive after installing? [#06062022]
ALL Vantec's enclosures are Green Enclosures, it is designed to save power when not in use.
If it is not connected to a working system, it will not power ON.
Please connect to a system that is working with OS loaded and running. Once it is connected to your working system and powered ON, it will spin up the drive and your system will acknowledge a USB storage connected.
Note: if you install a NEW hard drive for the first time, please use the OS tool to prep (initialize, partition and format) your new drive, you just need to do this once.
FAQ for CB-NSC300
FAQ:
IMPORTANT NOTE: ALL references to the 3.5” SATA Drive in this product imply the use of an Optional AC adapter.
1) Since there are three interfaces, can I connect two storage at the same time and use them?
No, the design of this adapter allows you to use ONLY one interface at a time, meaning you can only connect one storage to use at a time.
After using one storage, perform a proper eject of the USB device, power off and connect the second device, and power back on to use another storage
2) Do I need to prep (initialize, partition, and format) a new drive before using the drive for Storage?
If you are using this adapter for storage, AND if the drives are NEW (no existing data on it), you will need to prep the new drive before use for the first time. Please follow the FAQ on our website for help preparing (initialize, partition, and formatted) the drives. For Windows OS, use Disk Management, for Mac OS X, use Disk Utility.
3) There are three interfaces, why can’t I mount 3 drives?
The design of this adapter is for mounting only 1 drive. The M.2 NVMe, M.2 SATA, and the Standard SATA interface share the same channel, as a result, ONLY 1 drive is allowed to be mounted at one time.
4) Can I use this adapter as simple storage?
Yes, you can mount and it will see it as an individual drive letter or individual storage device.
5) Can I RAID them together with other storage?
Yes, you can, but it also depends on the RAIDED configuration, you can test to make sure all the storage will work together. It is not advisable to RAID storage of different speed, it will slow down the faster storage in your RAID group.
6) What capacity drive can I mount on this adapter?
It is (1/2/4/8TB) for M.2 NVMe or M.2 SATA, and (1TB or more) for a standard 2.5” or 3.5” SATA drive. We are constantly testing new and bigger capacity drives and will update the storage capacity as soon as it is tested. As of this writing 5/20/2024, we have tested 20TB drive.
7) What is the LED on this adapter?
There is only one LED for the power. It will be RED for Power OFF and White for Power ON, there are no LED for Read/Write Activity.
When the LED is RED (Powered OFF), you can swap the storage.
8) Can I use this adapter to do Cloning?
YES, you can Clone the following ways using a Laptop or Desktop installed with Cloning software:
Laptop or Desktop OS drive (SOURCE) è CB-NSC300 mounted storage (TARGET)
Other Storage (SOURCE) è CB-NSC300 mounted storage (TARGET)
CB-NSC300 mounted storage (SOURCE) è Other Storage (TARGET)
NOTE: the CB-NSC300 mounted storage can be M.2 NVMe, M.2 SATA, or 2.5”/3.5” Standard SATA.
Other Storage can be another enclosure Storage or Secondary Storage in a Laptop or Desktop.
We do not provide cloning software, most drive manufacturers provide free cloning software.
9) Can I use this adapter to perform a backup?
Yes, this adapter is very good for performing a backup of data from any source. You can perform a backup from or to this mounted storage device.
10) Do I need to add a heatsink for my M.2 SATA or M.2 NVMe?
It is good to mount a heatsink on your M.2, they generally run hotter due to the high speed of M.2. We designed the space around the M.2 with more space to accommodate a heatsink. There is ample space to mount M.2 NVMe with a mounted heatsink like Samsung 980 Pro with a heatsink or PNY CS3140 with a huge heatsink.
Here is the space measurement if you are using an M.2 mounted heatsink: (W) <=30mm x (L) 80mm x (BackDepth) 2.5mm (FrontDepth) >8.5mm
11) You mention this adapter requires an AC adapter if you are using a 3.5” SATA drive, what is the power requirement?
All 3.5” SATA III/II/I drives use 12VDC AND 5VDC, the total wattage may be more than 20watts, this amount of power is not available on USB. An AC adapter is required. This AC adapter must be able to provide at least 20 watts of power to the drive. This adapter comes with a power plug for 12VDC, 2A or better. Below is a recommended Optional AC adapter.
OPTIONAL AC ADAPTER requirement: Universal Auto-Switching 100-240 AC, Output, 12VDC, 2A-3A, Center Pin Positive, Outer Dia: 5.5mm, Inner Dia: 2mm, Barrel Length: 10mm.
If you are sourcing your own AC adapter, make sure it meets the specs mentioned above and has all the safety features marked (like UL, FCC, CE, and Energy efficiency) on the AC adapter.
12) What is the speed of the adapter?
This adapter is capable of USB 3.2 Gen2x1 (10Gbps), speed may vary due to different systems, USB Host, and devices.
13) How to prepare new storage for use (initialize, partition and format)?
Use this link below to help you walk thru the process.
https://www.vantecusa.com/search.php?sort=faq&keyword=33406
What is the Maximum Capacity Hard Drive can I install into the enclosure or Dock and Power Requirement of the drive? [#33402]
It can vary depending on the age and type of the Enclosures.
Please READ these Limitation:
1) For 2.5" SATA drive, Maximum Capacity alone is not the only thing you have to check, the other important criteria are the thickness of the drive. If your 2.5" enclosure will only fit a drive with the thickness (or height) of 7mm drive, trying to put a 9.5mm thickness drive into the enclosure will not fit.
2) The power requirement of the drive is also very important. Most drives are designed for installing into the systems with unlimited power. If you purchase a big capacity drive with power requirements that exceed the power your USB port can provide, it will not function. This is the fault of your USB port lack of power and your power hungry drive, not the enclosure issue. The enclosure uses minimum power. Your Drive plus the enclosure MUST not exceed the power capability of your USB port.
3) Support AF or 512e drives only, do not support 4Kn drives.
Please READ these Limitation:
1) The power requirement of the drive is also very important. Most drives are designed to draw less than 13 watts per drive. The enclosure uses minimum power and the ac adapter that comes with the enclosure are designed for most standard power requirement of the drives. If you purchase drives that draw too much power (greater than 13 watts) and exceed the specifications of the enclosure ac adapter, it will not function correctly. Please check the label on the drive for the power specifications. If your drives exceeded the limitation, you may have to purchase a bigger ac adapter for your needs, please contact Vantec Support for sizing the ac adapter for your needs and to purchase optional bigger ac adapter.
2) Support AF or 512e drives only, do not support 4Kn drives.
It can vary depending on the age and type of interface of the Dock.
Docks are designed for 2.5" or 3.5" SATA drives, for current shipping docks, 2.5" SATA HDD/SSD, the capacity ranges from 100GB to 4TB, and for 3.5" SATA drive, it is 500GB to 16TB. For older Docks purchased before 2015, it may only support 2TB or less. Please write to support@vantecusa.com for further help or questions.
Please READ these Limitation:
1) The power requirement of the drive is also very important. Most drives are designed to draw less than 13 watts per drive. The dock uses minimum power and the ac adapter that comes with the dock are designed for most standard power requirement of the drives. If you purchase drives that draw too much power (greater than 13 watts) and exceed the specifications of the dock ac adapter, it will not function correctly. Please check the label on the drive for the power specifications. If your drives exceeded the limitation, you may have to purchase a bigger ac adapter for your needs, please contact Vantec Support for sizing the ac adapter for your needs and to purchase optional bigger ac adapter.
2) Support AF or 512e drives only, do not support 4Kn drives.
Why is my CB-CU305MDSH or CB-CU302MDSH showing my two connected monitors in mirror mode only? [#01252024]
If you are using two external monitors to connect to the CB-CU305MDSH or the CB-CU302MDSH, please check what type of connection you are using.
There are multiple ways to connect 2 monitors to this adapter.
Using HDMI#1 + VGA OR HDMI#2 + VGA OR HDMI#1 + HDMI#2
There is a difference in how it is connected per our specifications:
A) HDMI①+VGA >> HDMI①+VGA: 1920x1080p@60Hz; MST-No; SST-Yes
B) HDMI②+VGA >> HDMI②+VGA: 1920x1080p@60Hz; MST-Yes
C) HDMI①+HDMI② >> HDMI①+HDMI②: 1920x1080p@60Hz; MST-Yes
As you can see above, if you are using (A) configuration, the “MST-No”, this will result in your two connected monitors showing in mirror mode ONLY.
If you are using (B) configuration, the “MST-Yes”, this will result in your two connected monitors being capable of showing in either extended or mirror mode.
If you are using (C) configuration, the “MST-Yes”, this will result in your two connected monitors being capable of showing in either extended or mirror mode.
If you are experiencing this issue, please unplug the HDMI cable from HDMI#1 from the CB-CU305MDSH or CB-CU302MDSH and plug it into the HDMI#2 port and you should be able to change between extended or mirror mode.
Firmware update for UGT-PCE320C [#11282023]
Download, unzip to a folder first (do not run from within the zip), right-click on the ASMTxHCI_MPTool.exe, and select run as administrator mode.
Make sure the card is in the system.
Click here to download firmware tool
What is Vantec enclosures Power Saving Function? [#01142020]
The Power Saving function of our enclosures assists in saving energy and at the same time helps extend the life of your drive.
1) Our enclosures when it is not connected to a working system, will not power ON.
If the storage enclosure is not connected to a computer, what is the point of wasting energy by spinning up the Hard Drive.
NOTE: If a user after installing their hard drive into the enclosure and without connecting to any working system, the enclosure will NOT TURN ON, this is normal by design.
You MUST have the enclosure connected to a WORKING SYSTEM (Powered ON) before turning ON the enclosure to see the drive spin up.
2) The enclosure is designed to follow the Power Saving function of the Operating System.
When it is connected and in usage, the enclosure will follow the Power Saving Setting of the OS to maximize usage and Power Saving.
Meaning when the system sleep, the enclosure will spin down the drive to sleep too. When the system wakes, the enclosure will wake and spin up the drive too.
3) Why is my enclosure NOT following the Power Saving function noted above?
For the enclosure to detect and follow the Power Saving Function listed above, the USB port on your system MUST be configured to do the same. If the USB port (either on the motherboard or an addon card is not configured correctly or do not support these function, it may prevent our enclosure from performing the Power Saving Function correctly.
If you have any further questions, please don't hesitate to write to us at support@vantecusa.com , we will do our best to answer them.
JMicron RAID Manager software not compatible with OS X 10.15 (Catalina) [#10222019]
The current version of JMicron RAID Manager software is 32bit. It is not compatible with OS X 10.15 (Catalina) because the OS requires all apps to be 64bit.
It is compatible with OS X 10.14 and older version.
Latest Windows and OS X DisplayLink Drivers for NBV-410DU3, NBV-400HU3, NBV-320U3, NBV-200U3, DSH-300U3, DSH-M100U3 [#02172021]
Latest Drivers from DisplayLink on Windows OS (7,8,8.1,10,11) and Mac OS X 10.x to 15.x
For the following products: NBV-410DU3, NBV-400HU3, NBV-320U3, NBV-200U3, DSH-300U3, DSH-M100U3
Date: Nov 29, 2021, OS X Combined Release version 1.2 to 1.6beta.
Please download and unzip to see individual version with release notes.
https://vantecusa.com/CKEdit/images/files/DisplayLink_ManagerGraphicsConnectivity_OSX_Releases.zip
Date: Nov 29, 2021, Windows OS Release version 10.1 M2.
Please download and unzip to see release notes.
https://vantecusa.com/CKEdit/images/files/DisplayLink_USBGraphicsSoftwareforWindows_OS_10_1_M2.zip
Date: Nov 29, 2021, Ubuntu 20.04 Release version 5.4.1.
Please download and unzip to see release notes.
https://vantecusa.com/CKEdit/images/files/DisplayLink_USBGraphicsSoftwareforUbuntu_5_4_1-zip.zip
Will your M.2 NVMe product support NVMe Module with B+M Key (PCIe Gen 3 x2)? [#12232019]
Yes, All our M.2 NVMe Enclosures supports NVMe Module both M Key (PCIe Gen3 x4) or B+M Key (PCIe Gen3 x2). Example of NVMe with B+M Key is the WD Blue SN500 NVMe SSD, Part# WDS250G1B0C, WDS500G1B0C.
Please do not get confuse M.2 NVMe B+M Key with M.2 SSD B+M Key. M.2 SSD Module will not function in the NVMe enclosure or on the NVMe add-on card.
Yes, All our M.2 NVMe Add-on Card supports NVMe Module both M Key (PCIe Gen3 x4) or B+M Key (PCIe Gen3 x2) too.
If you are not sure write to support@vantecusa.com for assistance.
Firmware update for the OLDER NST-205C3-SG (NON-TOOLESS ONLY) and NST-206C3-SG (NON-TOOLESS ONLY) [#03062020]
There is a Firmware update for the OLDER NST-205C3-SG (NON-TOOLESS ONLY) OR NST-206C3-SG (NON-TOOLESS ONLY).
This firmware update will not affect the module and can be performed with or without the NVMe module. This firmware is for correcting issues with WD NVMe with 2 lanes, if you are not using 2 lanes module, you do not need this firmware.
This firmware is only for the very early version of the enclosure. If you just purchase a new enclosure, you do not need this firmware.
Just plug the enclosure into the System USB port and run the firmware update software. If your enclosure firmware is current, it will not change. If your enclosure firmware is not current, it will update to the latest.
Here is the link: https://www.vantecusa.com/CKEdit/files/NST-205C3_206C3_FW_UpdateUtility_v133_01_00_02_03_06.zip
For further help, please write to VantecUSA support, you can reach them at support@vantecusa.com
Cannot install DisplayLink drivers after a NEW install Windows 10 [#05132021]
After install a NEW installation of Windows 10 OS, please do all the necesssary windows updates before installing the displaylink drivers. The displaylink drivers requires a minimum Windows 10 Anniversary Update for the drivers to install correctly.
The latest driver can be downloaded from DisplayLink website (www.displaylink.com) or our website (www.vantecusa.com).
How to use the Write protect switch on NST-203C3-SV, NST-204C3-SV, NST-205C3-SG, NST-206C3-SG and NST-207C3-RBG [#06012020]
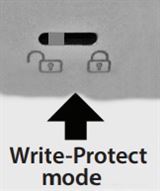
The write-protect switch on these enclosures is designed to block any OS-level file access.
The switch needs to be set first before it is connected to the USB port.
To change the storage to read-only, change the switch to lock position and plug the USB to your system like you normally do and you will see the OS view the files as read-only.
To change from lock to unlock or vise-versa, do a USB “safe to remove” first, unplug the device from the USB port, change the switch setting, and plug it back into your system.
It is not designed to change the mode while the storage is connected to the system. Changing mode while connected may produce an undesirable result.
Will the NST-271C31-BK support TRIM? [02072020]
Yes, the NST-271C31-BK will support TRIM.
If you have an older version that will not support TRIM, please use this link to update the firmware.
https://www.vantecusa.com/CKEdit/files/NST-271C31-BK_TRIM.zip
Download, unzip and follow the pdf instruction to flash the firmware.