The SATA/IDE to USB 2.0 Adapter is design to connect your hard drive to a USB port on your computer.
Here are some information on the connection to help you get started and troubleshoot the problem.
Select the type of drive you are using and follow the instruction closely and in this sequence to get the adapter to work.
FOR SATA (2.5” or 3.5”) drive:
1.Have everything disconnected
2.Reboot the computer
3.Follow the picture and make sure the hard drive is secure and properly connected to the device. Do not connect the USB to the computer yet.
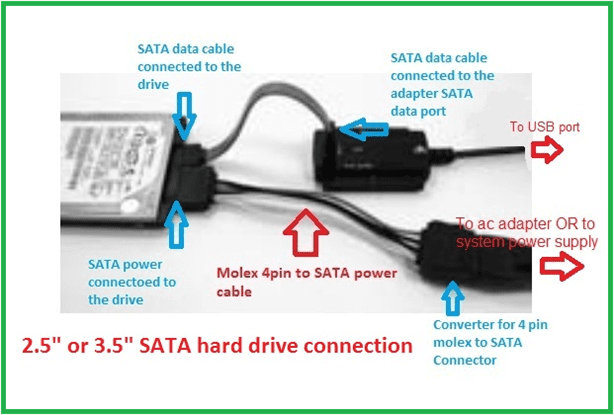
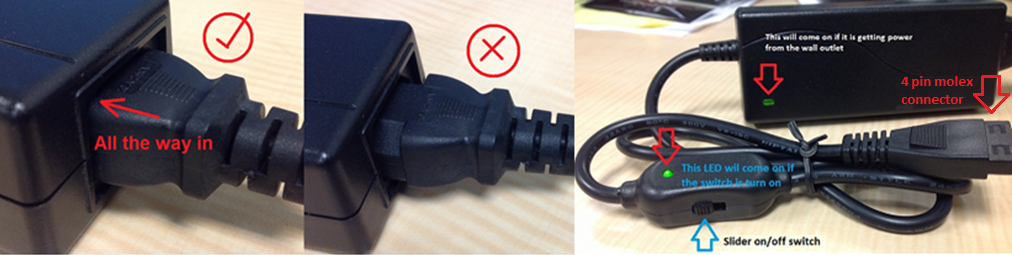
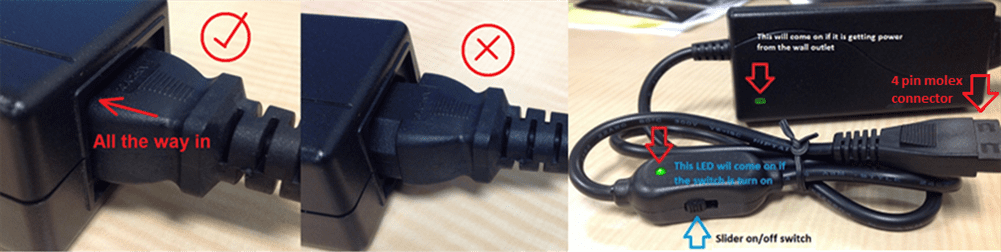
4.Proceed to connect the power to the hard drive. There are two LED on the ac adapter. One on the ac adapter and another near the Slider ON/OFF switch. See picture below.
5.Turn on the power (make sure both Green LED is ON) and let the hard drive spin up for about 20-25 seconds. (you should be able to hear the hard drive spin up).
6.. Once connected to your computer, the RED LED on the adapter will be ON.
7.Wait while the computer detects the device and automatically install USB drivers. (Sometime older drives may take as longer as 45 seconds to be detected)
8.Once the drivers are installed, the computer should see the hard drive in My Computers. (for Mac, see a USB icon of the drive on the desktop)
9. it may be your drive’s file system that was corrupted as a result you cannot read the drive in Windows Explorer.
FOR IDE (3.5”) drive:
1.Have everything disconnected
2.Reboot the computer
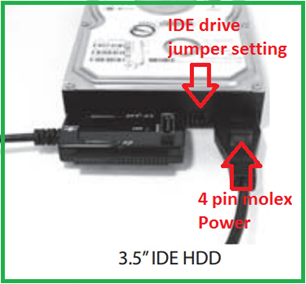
3.For 3.5” IDE drive, there are jumpers in the drive that may need to change for it to work correctly with this adapter. Check the instruction on the label of the drive, it should show the jumper setting for different setup like Master, Slave, CS (Cable Select) setting. Make sure the hard drive is set into MASTER Drive Mode only. Sometime in very rare cases, using is still not working correctly; you should try or Mode.
4.Follow the picture and make sure the hard drive is secure and properly connected to the device. Do not connect the USB to the computer yet.
5.Proceed to connect the power to the hard drive. There are two LED on the ac adapter. One on the ac adapter and another near the Slider ON/OFF switch. See picture below.
6.Turn on the power (make sure both Green LED is ON) and let the hard drive spin up for about 25-30 seconds. (you should be able to hear the hard drive spin up)
. Once connected, the RED LED on the adapter will be ON.
7.Wait while the computer detects the device and automatically install USB drivers. (Sometime older drives may take as longer as 45 seconds to a whole minute to be detected)
8.Once the drivers are installed, the computer should see the hard drive in My Computers. (for Mac, see a USB icon of the drive on the desktop)
9. it may be your drive’s file system that was corrupted as a result you cannot read the drive in Windows Explorer.
FOR IDE (2.5”) drive:
1.Have everything disconnected
2.Reboot the computer
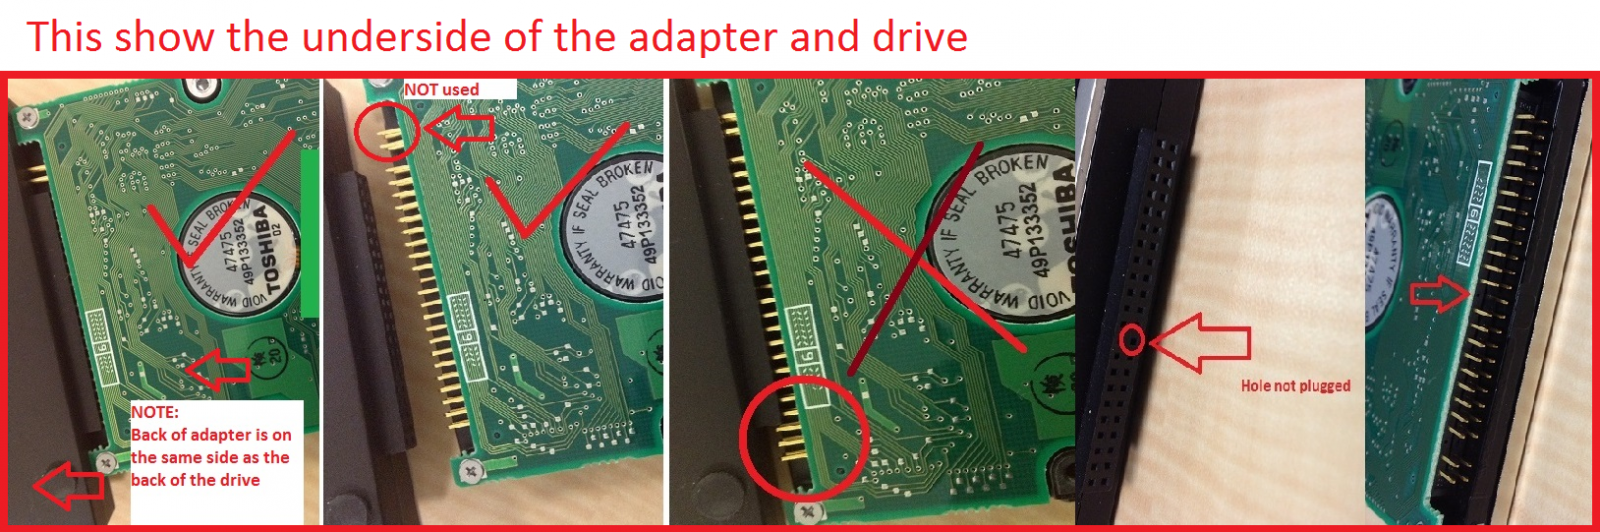
3.For 2.5” IDE drive, connecting it right is VERY IMPORTANT because the power pin is part of the 44 pin connection. Wrong connection will kill the disk instantly once plug in. Please be very careful.
Picture below show the UNDERSIDE of the drive and adapter. There are two sets of pins, a 4 pin and a 44 pin. The CB-ISATAU2 adapter will uses the 44 pin. The 4 pin are NOT USED. If you are still not sure, please write or call us for assistance.
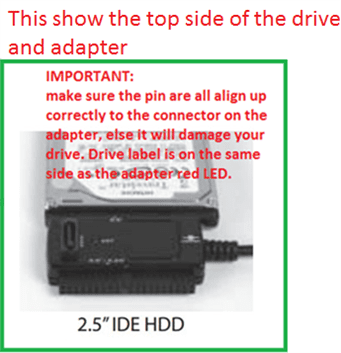
4.Follow the picture and make sure the hard drive is secure and properly connected to the device. Do not connect the USB to the computer yet.
5.Since 2.5” IDE drive is using power from the USB port, you do not need to connect the power adapter, but please use the USB port that can provide the most power to the drive.
A good way is to connect to a powered USB HUB if you have one. If not connect to the USB on the back of a desktop or tower system (avoid the front USB port).
6.Once connected to the USB port the drive should spin up and the RED LED on the adapter will be ON.
7.Wait while the computer detects the device and automatically install USB drivers. (Sometime older drives may take as longer as 45 seconds to a whole minute to be detected)
8.Once the drivers are installed, the computer should see the hard drive in My Computers. (for Mac, see a USB icon of the drive on the desktop)
9. it may be your drive’s file system that was corrupted as a result you cannot read the drive in Windows Explorer.
Troubleshooting guide for Hardware.
As for the device hardware,
Here is a troubleshooting tip to make sure that the AC adapter is working correctly:
Troubleshooting the AC Adapter: (This is what should happen in parenthesis)
1.Plug AC adapter into wall (see solid LED on AC adapter)
2.Turn on inline switch connected to the AC adapter (see solid LED on AC adapter and solid LED on switch)
3.Plug in the molex 4pin to SATA power (see solid LED on AC adapter and solid LED on switch) If the LED start blinking, this cable is shorted or bad.
4.Plug in the SATA power to the power connector on the hard drive. (See solid LED on AC adapter, solid LED on switch and the feel the drive spin up)
Troubleshooting the ISATAU2 Adapter: (This is what should happen in parenthesis)
1.All connected - AC adapter, drive except the USB to your system (NO red LED light on ISATAU2 adapter)
2.All Connected - AC adapter, drive and USB to your system (red solid LED light but not bright on ISATAU2 adapter)
3.No drive connected, just the ISATAU2 to the USB port (red solid LED light but not bright on ISATAU2 adapter)
4.All connected and drive doing transfer correctly (BRIGHT red solid LED light on ISATAU2 adapter)
Troubleshooting Guide for Software:
Check your system’s device manager under Universal Serial Bus controllers, If you see the subset list the “Standard USB Universal Host Controller”, you will have to get the correctly USB drivers for your system before continue. This device has a USB bridge chip and it need to talk to the onboard USB Chipset correctly. The “Standard” USB Chipset Drivers will not let this device work correctly. Once the drivers are updated, it will automatically see the device and work correctly.
Sometime is also because the disk is not initialized/corrupted/other format like raw/dynamic, get to the computer management console, START -> right clicking COMPUTER -> MANAGE and under STORAGE you will find DISK MANAGEMENT. From that point on you should be able to determine if the drive is there or the status of the drive.
OTHER Questions and Answers:
Q: Can I connect my CB-ISATAU2 to my USB 3.0 or USB 1.1 port?
A: Yes, the USB 2.0 connector on this adapter is backward and forward compatible with USB 1.1 and USB 3.0 port, but it will only performance at USB 2.0 or slower speed depending on the speed of the port.
Q: I took a hard drive out of an older notebook but the interface is different from what is available to connect the adapter, how can I get it to work?
A: Some notebook manufacturer uses an adapter interface to connect the hard drive to the notebook. If you remove the adapter interface you will see the standard SATA or IDE interface to connect to this CB-ISATAU2 adapter.
Q: How do I get power to the 2.5” IDE hard drive when there is not power connector?
A: The 2.5” IDE hard drive gets it power from the USB 2.0 port on your computer. If your 2.5" drive power requirement exceed the provided power from the USB 2.0 port, it will cause the drive not to recognize correctly. Please use an external powered USB Hub for the 2.5” IDE drive to work correctly.
Q: What type of symptom will I get if the drive is under powered?
A: You may see problems like not able to see the drive, asking you to format the drive, drive spinning up and down, clicking sound or disconnection symptom.
Q: Will this CB-ISATAU2 work on my Mac?
A: Yes, it will work your Mac OS X 10.6 or newer.
Q: Can I use the CB-ISATAU2 as a boot device?
A: No, it will not work as a boot device.
Q: Why is Windows Operating System asking me “Do you want to format this drive”, I have important data on the drive that I want to retrieve. What can I do?
A: If you have important data on the hard drive, do not format the drive. Windows OS try’s to read the data and could not read it due to file corruption or unknown format; it will then ask if you want to format this drive. Please answer NO and use data recovery software to recover your data.
Q: Can this CB-ISATAU2 read other file systems format?
A: The CB-ISATAU2 can read other file systems format if the computer it is connected to can read the format of the drive.
Q: My old computer cannot boot and I took the drive out. I then connect it to the CB-ISATAU2 adapter and try to retrieve the data using my new computer and it is saying “access denied”. What is wrong?
A: Due to security reason, you do not have rights to the data on the old computer. You can access the data by taking ownership of the data so that you can get your data back. You can search on the web for instructions on how to take ownership of files or folders.
Q: Will the CB-ISATAU2 work with Advanced Format (4Ksector) Drives?
A: No, it will not work with Advanced Format (4K sector) Drives. We do have other product that will like CB-ISA200-U3 or CB-ISATAU3.
Q: My computer crush and I cannot boot to Windows. Can I use this CB-ISATAU2 to retrieve the data on the hard drive?
A: It depends on the cause of the computer crush. If the crush is cause by files corruption or other software problem not related to the hard drive, you should be able to retrieve the data. If it is cause by the hardware of the hard drive, you may not be able to retrieve any data using the CB-ISATAU2.
Q: Will the CB-ISATAU2 works with my Windows 8/8.1/10 OS?
A: Yes, it will work correctly for Windows 8/8.1/10 OS
Q: I have other questions that is not listed here, what can I do?
A: If you are located in the USA/Canada, you can email our support representative using the Contact Us section of the website
Here are the steps to setup RAID on the NST-272S3-BK.
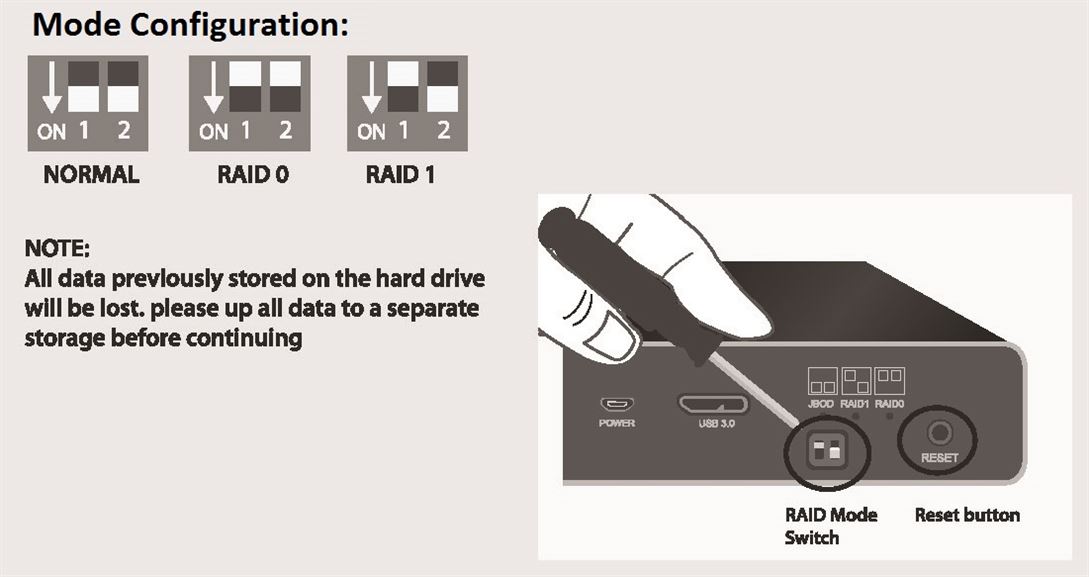
1) Power ON your system, wait for the system to be fully booted up
2) Use a pen tip to change the RAID switch to the right setting
3) Power up the unit, plug in the USB cable to your system
4) Wait for the drive to spin up if this is HDD, If SSD go to the next step
5) Press and hold the reset button for 3 seconds (HDD LEDs will turn off)
6) Release the reset button and the built-in RAID controller will activate the RAID Mode based on the RAID dip switch setting
7) The RAID is now ready to be initialize, partition and formatted for the Operating System you are using before it can store data
8) For Windows, use Disk Management. For OS X, use Disk Utility
For detail instruction refer to the FAQ "How to preparing a New storage, Hard Drive, or SSD for use with a system?"
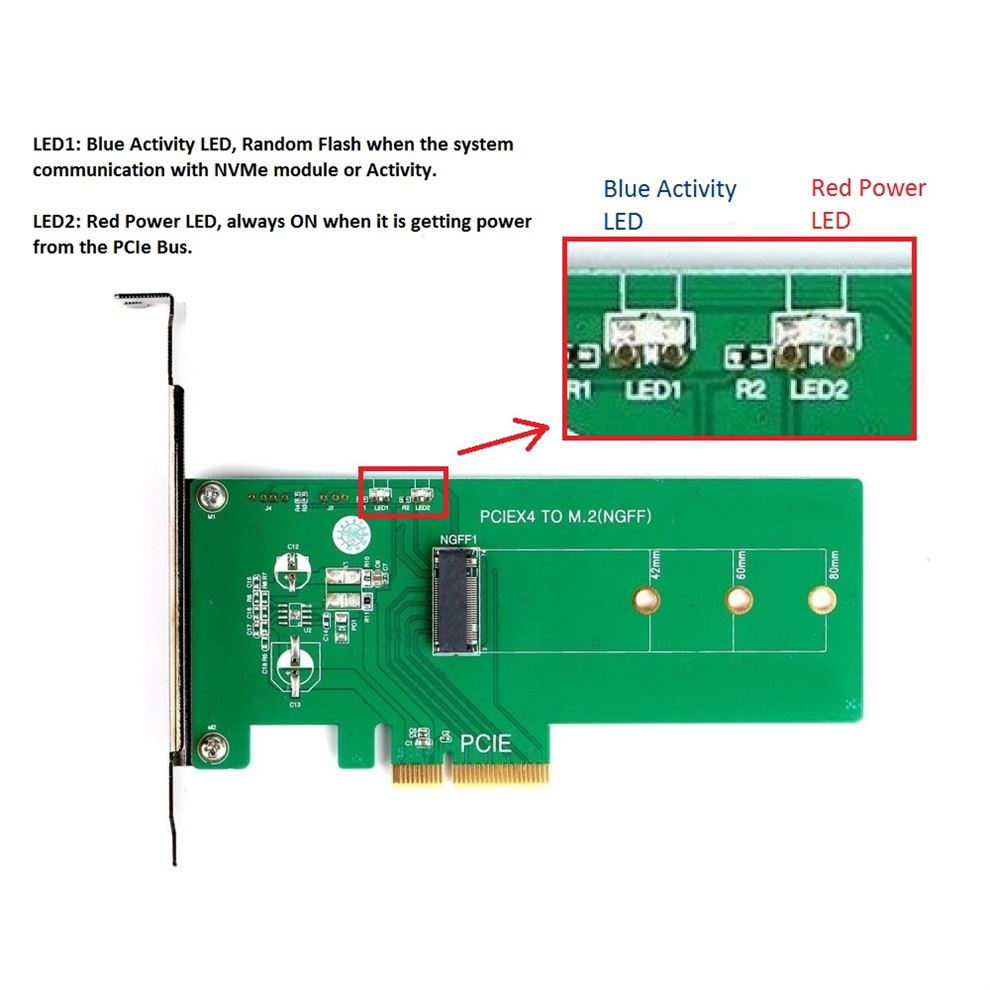
The LEDs on the card show the power and activity of the NVMe and UGT-M2PC100 / UGT-M2PC110 card.
When the card is getting power from the PCIe Bus, the Red LED2 will always be ON. If this Red LED2 is not ON, please check and reseat the card, follow the steps outline in the Knowledge Base here.
https://www.vantecusa.com/faq.php?fc_id=5
When the card is getting power (Red LED2 is ON) and the Blue LED1 is not Random flashing (activity), during boot or use, please check the NVMe module and make sure the NVMe module is seated all the way into the M.2 interface. Check for short and proper mounting of the NVMe module on to the card.