About Windows 7 ++++++++++++++++++++++++++++++++++++++++++++++
Some Firewire device may have a problem talking to the Firewire Host card due to the Microsoft Firewire drivers issue.
A simple correction is to use the Legacy drivers. See below for help.
Below is the step by step instructions on how to install the Legacy driver so you won‘t have any problems either:
Click Start
Then click on Control Panel
Click on Device Manager
Note: If you don’t see Device Manager listed, click on View By Category on the top right side of the
Control Panel Window.
Then Click on Large Icons
You should now have a list of items in the Control Panel and click on Device Manager.
Under the Device Manager, look down the list for IEEE 1394 Bus Host Controllers and Double Click on it.
It should display something like - 1394 OHCI Compliant Host Controller
Note: If it has the word (Legacy) behind it, you are already setup and you can just exit out.
Next, double-click on the 1394 OHCI Compliant Host Controller
A window will popup saying 1394 OHCI Compliant Host Controller Properties
Click on the Driver Tab
Then look down in the window and click on Update Driver
Then select - Browse my computer for driver software
Next select - Let me pick from a list of device drivers on my computer
It will bring up a list of drivers.
Click on 1394 OHCI Compliant Host Controller (Legacy)
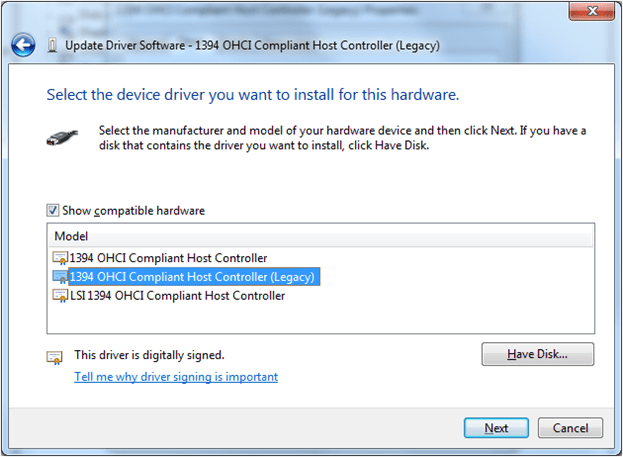
NOTE: It is important that you select the one with (Legacy) after it, just like shown above.
Then click next
once it installs the 1394 OHCI Compliant Host Controller (Legacy),
it will say Windows has successfully updated your driver software.
Click on the Close button and exit out of all of the other windows.
Then Reboot your computer.
You will now be able to import video via the Firewire port on your computer.
NOTE: We have noticed that when Microsoft has issued certain updates, it can cause Windows 7 to switch back to use the original 1394 OHCI Compliant Host Controller driver. If you notice the Firewire device is not working again just repeat the above steps and reinstall the Legacy driver.
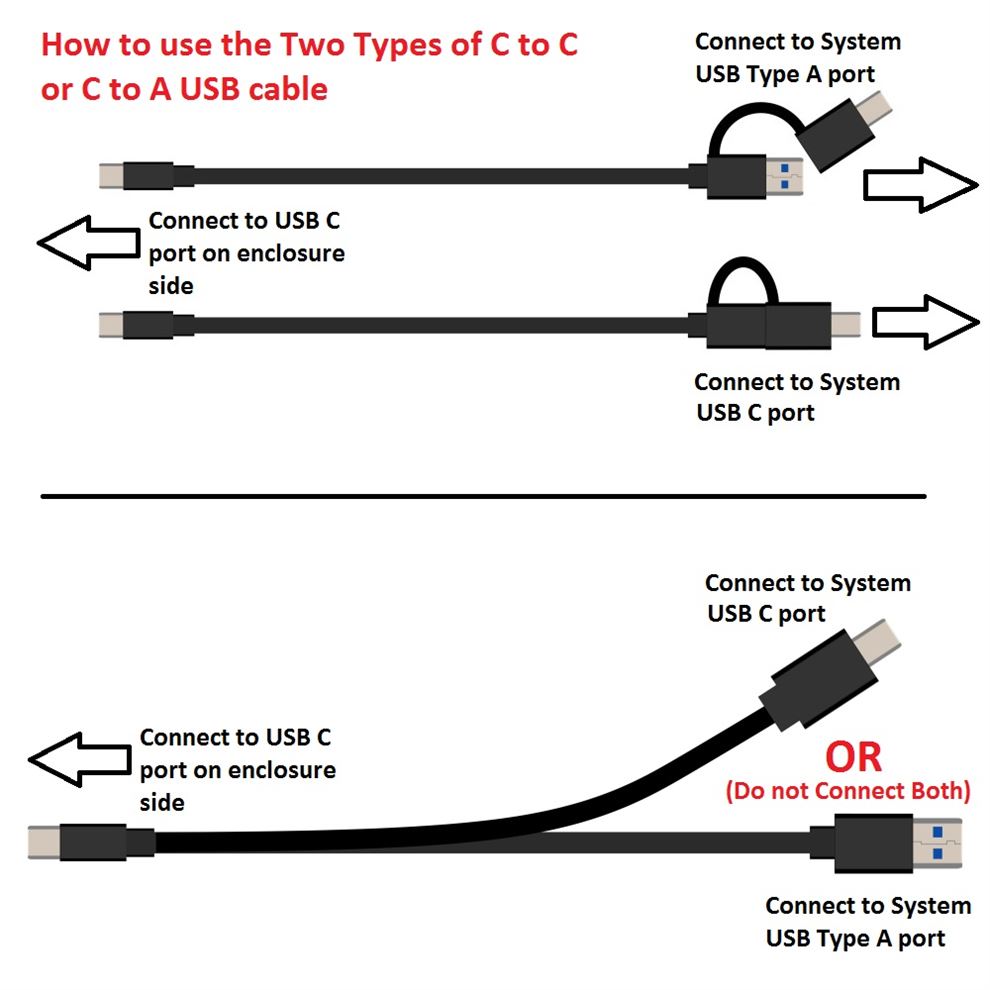
Some enclosures you purchase may come with the following USB cable shown below or Dual cable.
For USB cable shown below, the right way to connect the cable is to plug the single USB C to the enclosure first
and the other end to your system USB port shown. Do not reverse the connection, it may not work.
For Dual cable (two cable, C to C and C to A) the right way to connect the cable is to see what type or port is available
on your system and use the C to C or C to A. First plug the single USB C to the enclosure and the other end to your system USB port
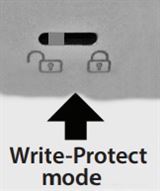
The write-protect switch on these enclosures is designed to block any OS-level file access.
The switch needs to be set first before it is connected to the USB port.
To change the storage to read-only, change the switch to lock position and plug the USB to your system like you normally do and you will see the OS view the files as read-only.
To change from lock to unlock or vise-versa, do a USB “safe to remove” first, unplug the device from the USB port, change the switch setting, and plug it back into your system.
It is not designed to change the mode while the storage is connected to the system. Changing mode while connected may produce an undesirable result.
Here are some common questions about this Optical Drive Enclosure (NST-540S3-BK)
1) After installing my optical drive into the enclosure AND I DID NOT connect to a computer, can I test to see if the unit is working?
You can see your optical drive LED will briefly come ON and then OFF. You can eject the tray to open and close.
2) Once it is connected to my WORKING computer via USB, connect the power and turn ON the enclosure what will happen?
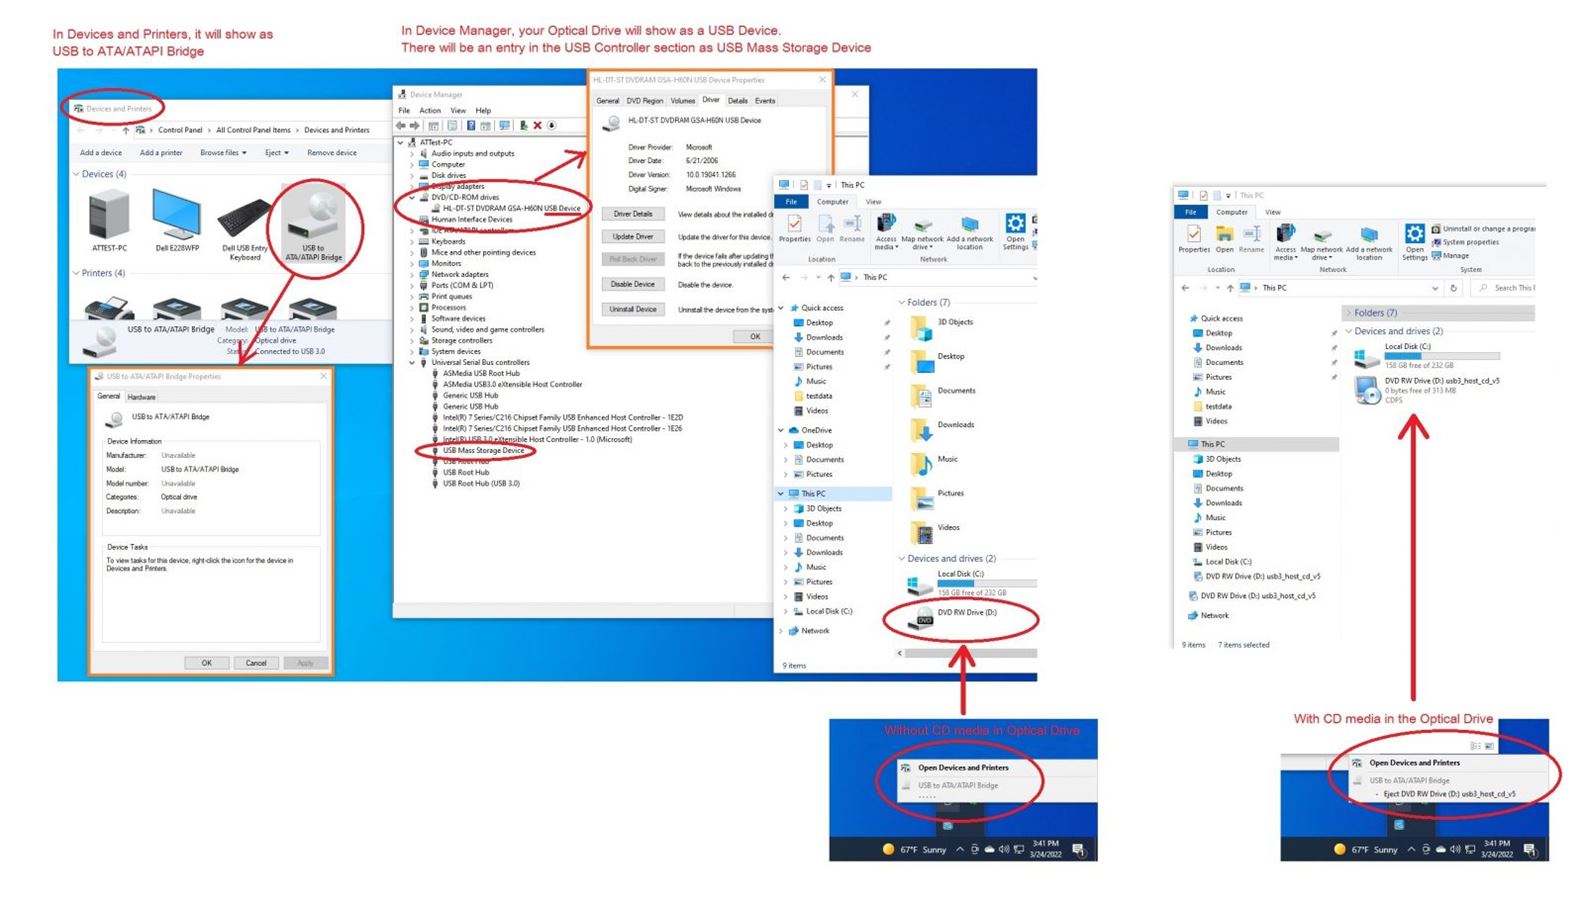
If you are using Windows 10, your system will see your optical drive as a USB storage device. See attached picture.
If you are using Windows 10, AND you have CD media in your optical drive it will show within Windows Explorer under Device and Drives as an optical drive with a media and drive letter assigned to it. On the TaskBar (bottom right) it will list as an Ejectable USB device.
3) What happens when my system goes to sleep mode?
When that happens, the optical enclosure will also put the optical drive to sleep.
4) There is no LED, how can I know if the enclosure is working?
The NST-540S3-BK serves as a USB enclosure for your optical drive, any LED activity on your optical drive will serve as the LED for the whole unit. The LED on your optical drive will function just like when your optical drive is installed inside your desktop computer via the internal SATA port. If your optical drive is working, the enclosure will too.
5) How much power is the enclosure with my optical drive using when it is in sleep mode?
We test using a Watt meter and it shows as less than 2 Watts during sleep mode with the enclosure and a common Optical drive.
6) Can I use a longer USB cable and Is this cable a USB standard cable?
It is not a good idea to use a longer cable, USB 3.0 cables are very susceptible to signal strength loss and interference. The USB cable that we provided is good, Yes, it is a standard USB 3.0 cable with Type A to Type B.
7) Do you have the Specs of the ac adapter, USB cable length, and what depth of my optical drive can I put into the unit.
Fit Optical Drive Max Depth: 7.2 inches / 185 mm; AC Adapter: Universal Switching AC adapter, 12VDC/3A, center pin positive, outer diameter: 5.5mm, inner diameter: 2.1mm, barrel length: 10mm; USB Cable: USB 3.0 Type A to Type B cable, length 100 cm
Sometime problems may occur during first installation or use, we at VantecUSA like to help you get it working to resolve the problem. We have a team of support staff that is here to help you. Please write to us first before you return the product back to the place of purchase. We are committed to help you get the product setup and working correctly. You can reach us via email at support@vantecusa.com. We will reply to you very quickly to assist you.
Why after cloning my SATA boot device, to a new M.2 NVMe drive, it will not boot and error out?
This is a common problem with cloning when you clone dissimilar interfaces like SATA to NVMe (PCIe). The SATA drive is managed by the SATA controller and M.2 NVMe is managed by the PCIe controller. These two dissimilar controller uses different OS drivers. After you clone the SATA drive to your M.2 NVMe (PCIe), the OS on your boot drive will try to boot via the SATA on an NVMe controller. This will often give you an error or a blue screen or hang during boot.
As you can see, it is not a problem with the cloning process or the cloning device. It is how the OS interprets the boot process and boots from the right controller.
Here is how to get around this common problem.
The process is simple, all you need to do is to boot your OS into safe mode. Safe mode uses a generic boot device without any reference to SATA or NVMe, it will boot correctly and prepare the OS to boot using the NVMe (PCIe) on your next boot. Once that is done, it will remember to boot correctly for the rest of the time.
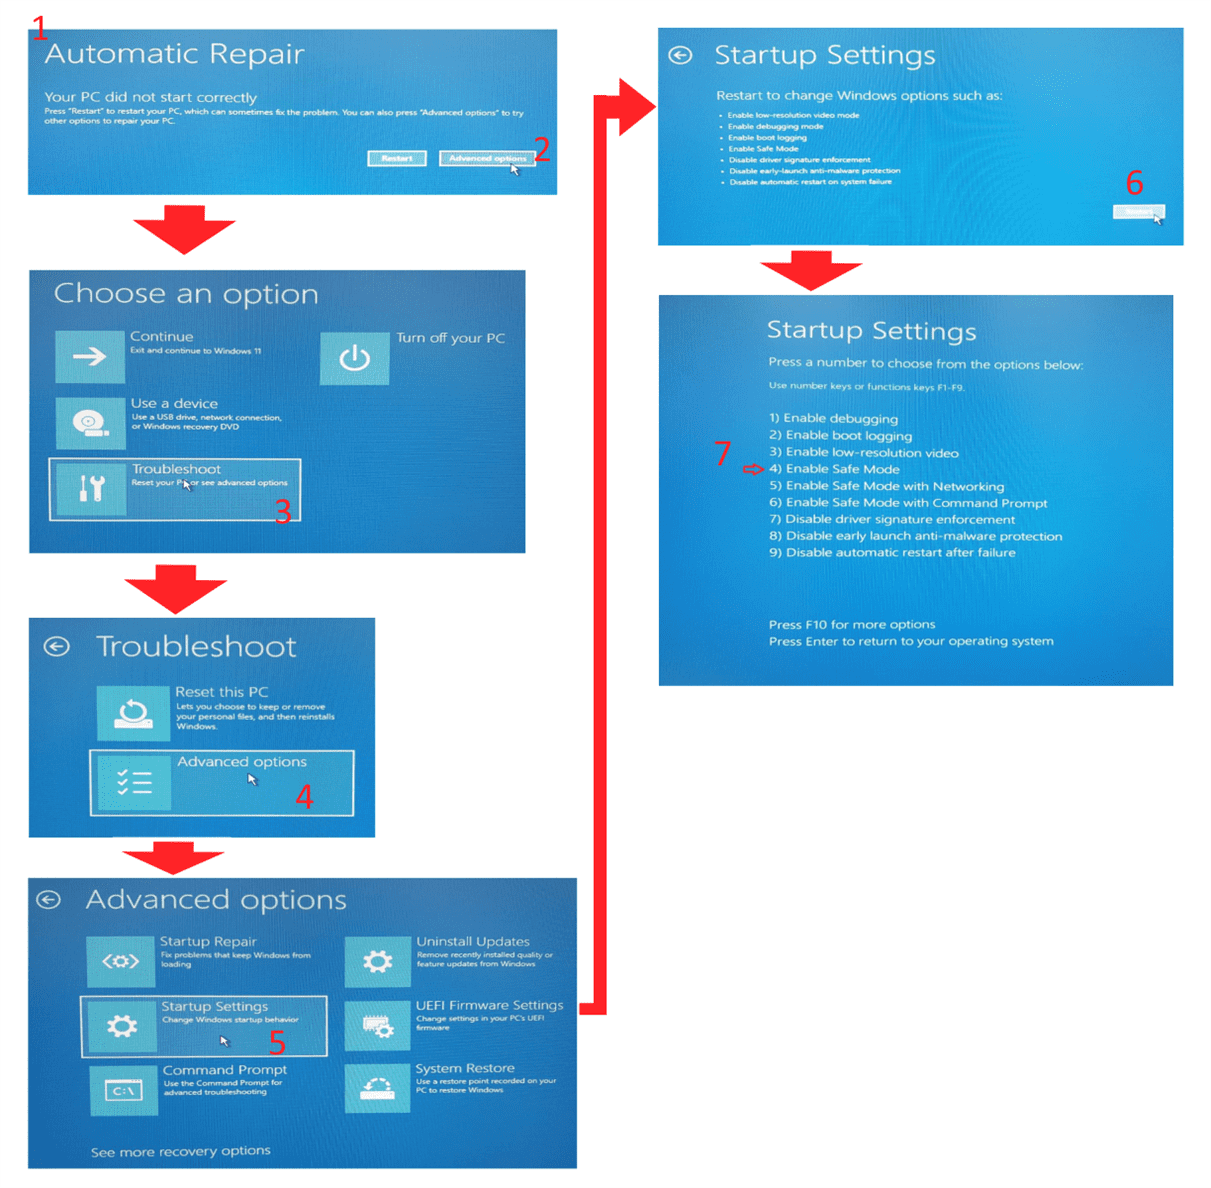
Here is the step by step to correct the problem (picture below follow the steps listed here):
1) During the initial boot, the OS will report an error message and enter into the “Automatic Repair” Process.
2) Choose “Advanced Options”
3) Choose “Troubleshoot”
4) Choose “Advanced Options”
5) Choose “Startup Settings”
6) In this Startup Settings, click restart.
7) In the Startup Settings, you will be given a selection to press a number to choose the option. Press “4” to select Enable Safe Mode. The PC will restart into Safe Mode. Your screen will show a normal Desktop with Safe Mode showing on 4 corners.
8) You may notice your system runs slower in safe mode, this is normal. Now restart your computer again. It will restart in normal mode and you are done.
VantecUSA support is available via email or phone (during normal business hours, PST – California, Mon – Fri 9 am - 6 pm).
You can reach them easily via VantecUSA.com website contact form OR email support@vantecusa.com OR phone at 510 668 0368 and ask for support.
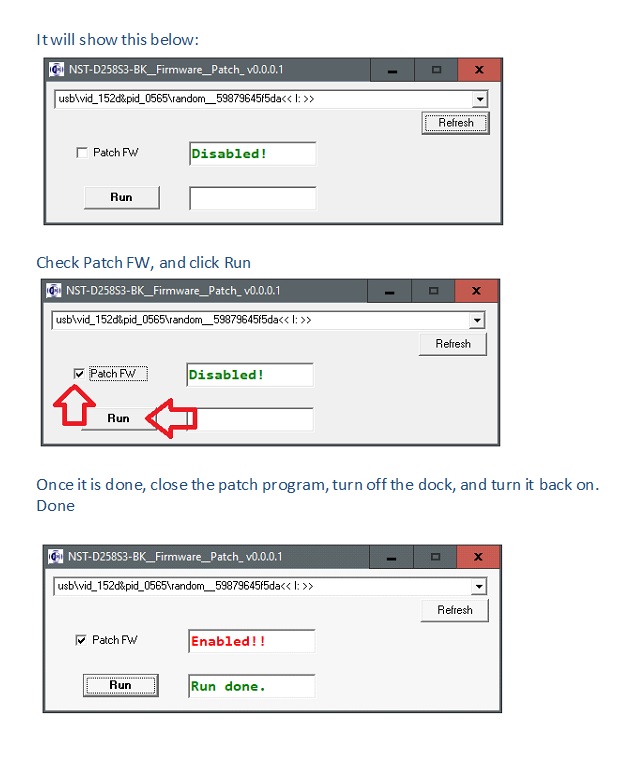
Download the zip file (Link here) , and unzip it to a folder.
Run the “NST-D258S3-BK_Patch_1001.exe”
Your system will ask for permission to run the patch, click yes.