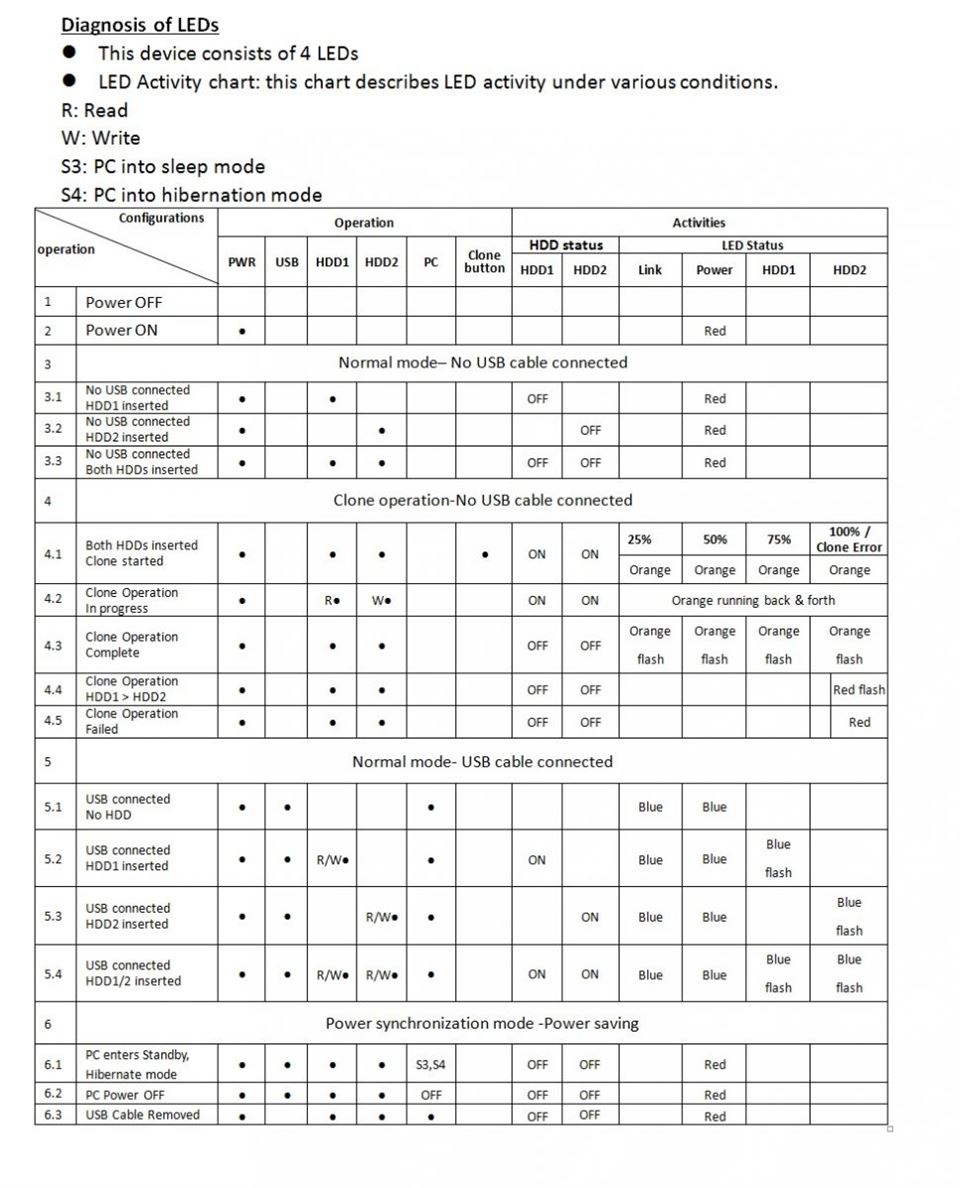
LEDs status for UGT-M2PC200 [#03162020]
3.5" IDE drive will not spin up when connected to power and adapter - CB-ISATAU2, CB-ISA225-U3 [#05052020]
On rare conditions using CB-ISATAU2 or CB-ISA225-U3 adapter, the 3.5" IDE will not spin up when connected to power and the USB adapter.
This is caused by a circuit loop between the drive with the USB adapter and it will short out the ac adapter. It prevents the ac adapter from functioning and providing power to the drive to spin up.
Try the following:
1) Have everything disconnected
2) Reboot the computer
3) For a 3.5” IDE drive, there are jumpers in the drive that may need to change for it to work correctly with this adapter. Check the instruction on the label of the drive, it should show the jumper setting for a different setup like Master, Slave, CS (Cable Select) setting. Make sure the hard drive is set into MASTER Drive Mode only. Sometimes in very rare cases, using Master Drive Mode is still not working correctly; you should try other Mode.
4) Follow the instruction for your CB-ISATAU2 or CB-ISA225-U3 for connecting the power supply ONLY to the drive. Turn On the power switch and let the drive spin up.
5) Once it starts to spin, plug the USB adapter IDE connection to the Drive IDE, continue to let it spin up for 30 seconds.
6) After the 30 seconds is up, connect the USB to your computer, you should see the LED on the adapter lit up.
7) Wait while the computer detects the device and automatically installs USB drivers. (Sometimes older drives may take as long as 45 seconds to a whole minute to be detected)
8) Once the drivers are installed, the computer should see the hard drive in the File explorer (for Mac, see a USB icon of the drive on the desktop).
Do the UGT-PC371AC USB-C port support support DP Alt Mode? [#05182020]
The UGT-PC371AC is a PCIe USB 3.1 Gen 2 Host card with USB-A and USB-C port.
The USB-C port on this card does not support DP Alt Mode.
It is important for you to understand why it will not support and so that you can have a better understanding of the USB-C technology.
For a USB-C port to provide or support video capability, it MUST support the DP Alt Mode function.
The physical USB-C connector/interface consists of a series of USB pin signals. This signal may or may not include the DP Alt Mode signal.
If you purchase a laptop or desktop system, it may have a USB-C port. That USB-C port can have the DP Alt Mode signal or it may not depend on the design by the system manufacturer.
If the USB-C port DOES HAVE the DP Alt Mode pin signal and function, you can connect an adapter to output HDMI display.
If the USB-C port DO NOT HAVE the DP Alt Mode pin signal and function, it is considered a pure data port, it will not support any adapter to output HDMI display.
DP Alt Mode is video signals, they are not data signals.
DP Alt Mode signal comes from the video controller directly, it cannot go through the PCIe bus because the PCIe bus does not have the DP Alt Mode pin set or can pass the DP Alt Mode signal.
This is why a PCIe USB Host controller card like the UGT-PC371AC will not be able to provide DP Alt Mode function. Simply because it cannot provide any video signal (DP Alt Mode) be itself or gets it from the video card through the PCIe bus.
If you get a video card that has a USB-C port on it, very likely it will have the DP Alt Mode because the video controller can route the DP Alt Mode signal straight to the USB-C port on that same card.
You may also want to know since the UGT-PC371AC USB-C does not support DP Alt Mode, how can I get this to work. The answer is not possible, since the DP Alt Mode signal is not there.
The only way is to find a USB-C Host controller that also has a video controller built on the same card with DP Alt Mode OR get a video card that has USB-C port with DP Alt Mode support.
Look at this FAQ to understand more about the DP Alt Mode.
LED status for NST-272S3-BK [#05202020]
During normal operation with RAID or non-RAID configuration:
Normal LED function:
|
|
HDD 1 LED |
HDD 2 LED |
HDD Power |
|
Power |
ON |
ON |
ON |
|
HDD 1 Disk Access |
Random Blinks |
SOLID ON |
ON |
|
HDD2 Disk Access |
Solid ON |
Random Blinks |
ON |
|
No Disk Access |
SOLID ON |
SOLID ON |
ON |
|
Sleep Mode |
OFF |
OFF |
OFF |
|
PC Power OFF |
OFF |
OFF |
OFF |
|
USB Ejected |
OFF |
OFF |
OFF |
For Individual Mode operation, LED (blue) function:
|
|
HDD 1 LED |
HDD 2 LED |
|
HDD 1 Disk Access |
Random Blinks |
SOLID ON |
|
HDD2 Disk Access |
Solid ON |
Random Blinks |
|
HDD 1 Defective |
LED OFF |
LED ON |
|
HDD 2 Defective |
LED ON |
LED OFF |
For RAID 1 Mode operation, LED (blue) function:
|
|
HDD 1 LED |
HDD 2 LED |
|
RAID 1 Degraded (HDD 1 bad) |
LED OFF |
LED ON (Normal, blink during disk access) |
|
RAID 1 Degraded (HDD 2 bad) |
LED ON (Normal, blink during disk access) |
LED OFF |
|
RAID Rebuild |
LEDs blink during the rebuilding |
LEDs blink during the rebuilding |
|
RAID Rebuild Complete |
LED ON, Random blink, back to normal |
LED ON, Random blink, back to normal |
For RAID 0 Mode operation, LED (blue) function:
|
|
HDD 1 LED |
HDD 2 LED |
|
RAID 0, Normal, No Disk Access |
LED ON |
LED ON |
|
RAID 0, Normal, Disk Access |
LED ON, blink during disk access |
LED ON, blink during disk access |
|
RAID 0 (HDD 1 bad) |
LED OFF or SOLID (depend on the drive) |
SOLID ON |
|
RAID 0 (HDD 2 bad) |
SOLID ON |
LED OFF or SOLID ON (depend on the drive) |
RAID Dip switch and RAID LED setting:
To change Mode, turn on the unit with drives, change the Dip Switch, and hold the reset button for 3 seconds.
Note: Change mode will erase all the data on the drives.
|
RAID Mode |
Dip Switch |
LED |
|
Normal |
Down | Down |
ON | OFF | OFF |
|
RAID 0 |
Up | Up |
OFF | OFF | ON |
|
RAID 1 |
Up | Down |
OFF | ON | OFF |
Questions and Answers for MRK-NVM2U2-BK [#11032020]
NST-387S3-BK Fan replacement [#11232020]
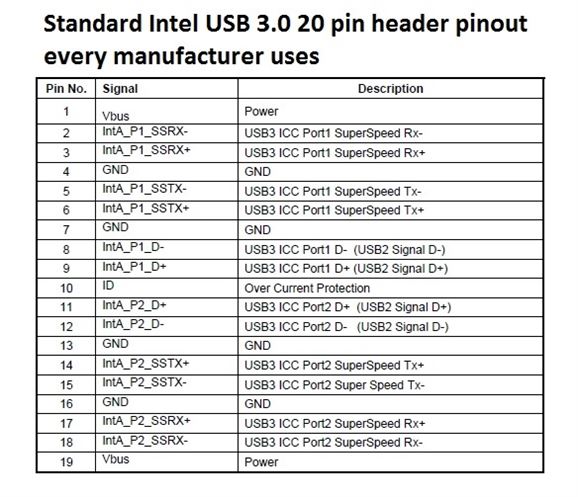
Standard USB 3.0, 20 pin header pinout on Vantec products. HDA-502H, UGT-IH203, HDA-302H, UGT-CR935 [#12092020]
We carry a few products that use the USB 3.0 20 pin header.
We follow Intel USB 3.0 20 pin header pinout specification. If your 20 pin header on your motherboard does not follow this standard, it may not be compatible with our product. Here are the pinout specs.
Products using this standard are HDA-502H, UGT-IH203, HDA-302H, UGT-CR935.
Master / Slave Jumper setting on CB-IS200 Converter [#12222020]
Please note the jumper on the converter by default is on the Master setting. Since this is connecting to a single device, it should always on the Master setting.
There is no need to change the jumper setting to slave.
If you are using a very old IDE device (non-ATAPI) and using the Master jumper is not working, please try slave setting.
If you need further help, please write to technical support at support@vantecusa.com
latest OS X Drivers for CB-U320GNA [12302020]
latest OS X drivers for Catalina OS
https://www.vantecusa.com/CKEdit/files/RTUNICv1_0_22_Update4.zip
What is Prop 65 and the warning on Vantec products packaging? [#02012020]
What is Proposition 65?
Proposition 65 requires businesses to provide warnings to Californians about significant exposures to chemicals that cause cancer, birth defects, or other reproductive harm. These chemicals can be in the products that Californians purchase, in their homes or workplaces, or that are released into the environment. By requiring that this information be provided, Proposition 65 enables Californians to make informed decisions about their exposures to these chemicals.
Why the Prop 65 warning label?
Warnings are based on a compile list of chemicals published by the State of California (over 800 and growing) which may pose an increased risk of cancer and/or reproductive harm if exposed to minimum levels, also known as Safe Harbor levels are exceeded. These warnings are widespread within California and can be found across many industries including food and beverage sales, clothing sales, furniture sales, automotive repair, electronics, etc.
Should I be concerned about the safety of your products?
Although you should always be aware and take notice of any product warning, a Prop 65 warning does not mean that a product is unsafe. The State of California’s website states, “A Prop 65 warning does not necessarily mean that a product violates any product-safety standards or requirements.”
For more information please refer to this link: https://www.p65warnings.ca.gov/
Vantec Link USB 3.0 Type C Gigabit Ethernet Adapter (CB-CU310GNA) Latest Drivers [#02052021]
Dear Users,
Thanks for choosing Vantec Link USB 3.0 Type C Gigabit Ethernet Adapter (CB-CU310GNA).
You can find the drivers for this product in the product itself or via our website. When you connect the adapter to your working computer, you will see a virtual drive. The virtual drive will have Windows OS Drivers only.
We also provide the latest drivers on our website. Here is the support tab that has the drivers and manual: https://vantecusa.com/products_detail.php?p_id=271#tab-3
From time to time when new drivers are available, we will update with the latest.
If you have further question, please feel free to write to VantecUSA support for more information:
LED status of NST-DP100S3 [#10082021]
Why is my RGB motherboard cannot control this Synable RGB enclosure? [#10082021]
RGB for controlling USB storage devices is a little new.
Normal RGB within a system relies on the RGB header on the motherboard to be connected to the RGB device to give you the RGB color and sync with the system RGB component.
There are two types of USB storage with RGB.
1) USB storage without MCU Chip (Micro Controller Unit), this type of RGB USB storage cannot sync with the system RGB controller and will flash random RGB without any control of the system RGB controller.
2) USB storage with MCU Chip (Micro Controller Unit), this type of RGB USB storage MCU will communicate with the system RGB controller and will be under the control of the system RGB controller. It is capable of displaying RGB color in sync with the system setting. This implementation of synable capability requires an RGB motherboard with the latest update of the RGB software (for the motherboard) to be fully functional. If your RGB motherboard cannot or does not have these capabilities, this synable RGB enclosure will still function, but the RGB will function independently (not synable). Our Synable RGB enclosure also offers an ON/OFF switch for the RGB function.
Booting from Installed OS drive and booting from UEFI for UGT-ST644R [#10292021]
If this is an existing HDD with Windows OS boot from your motherboard and now you move to the UGT-ST644R, it will never boot because your OS is already locked in the registry to your motherboard chipset, and moving the drive to this card using Marvell chipset will either not boot or blue screen (BSOD).
If you are doing a new install of the OS, it will be fine.
This controller do not support UEFI booting, it will not see the controller and the drive(s) attached to the controller
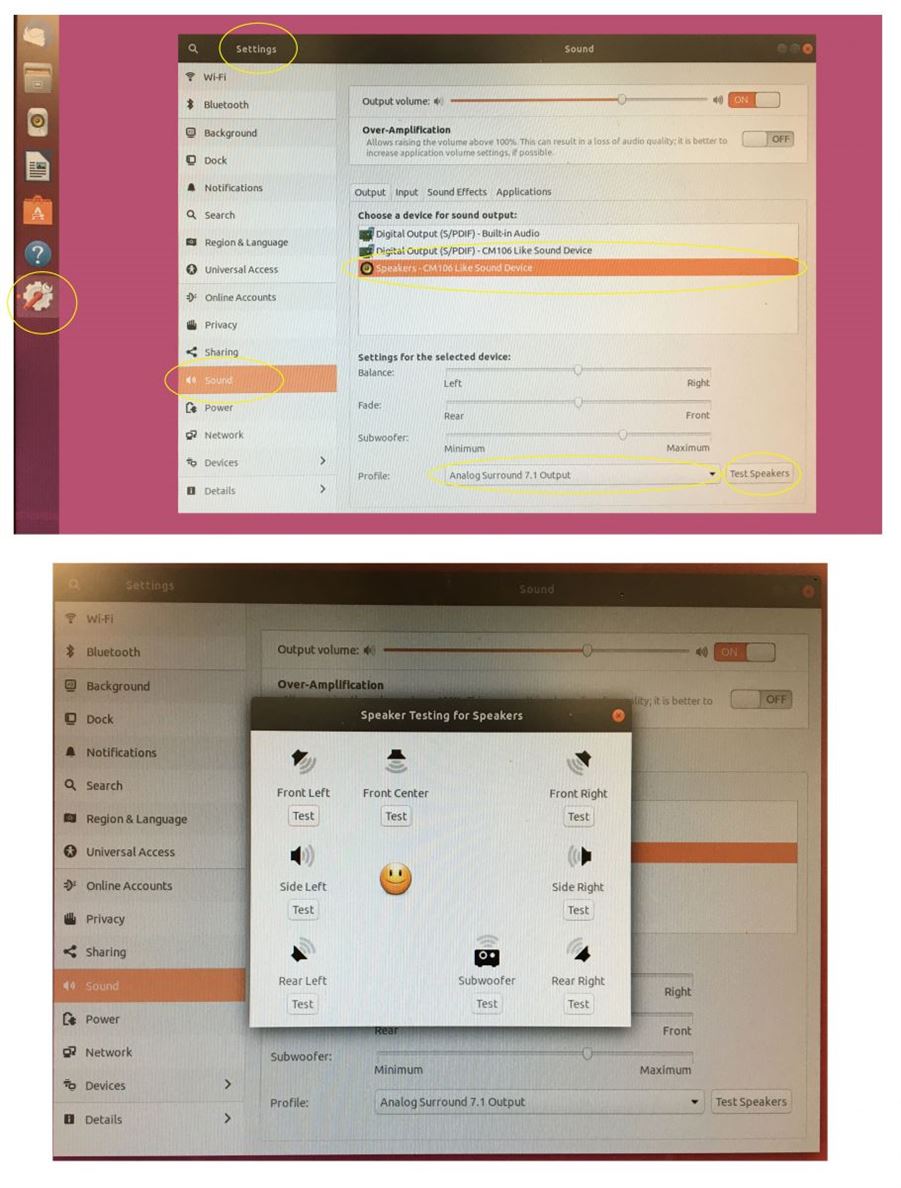
NBA-200U Linux Support [#03042022]
Linux support for this product is using native CM106 sound setting.