NBA-200U Linux Support [#03042022]
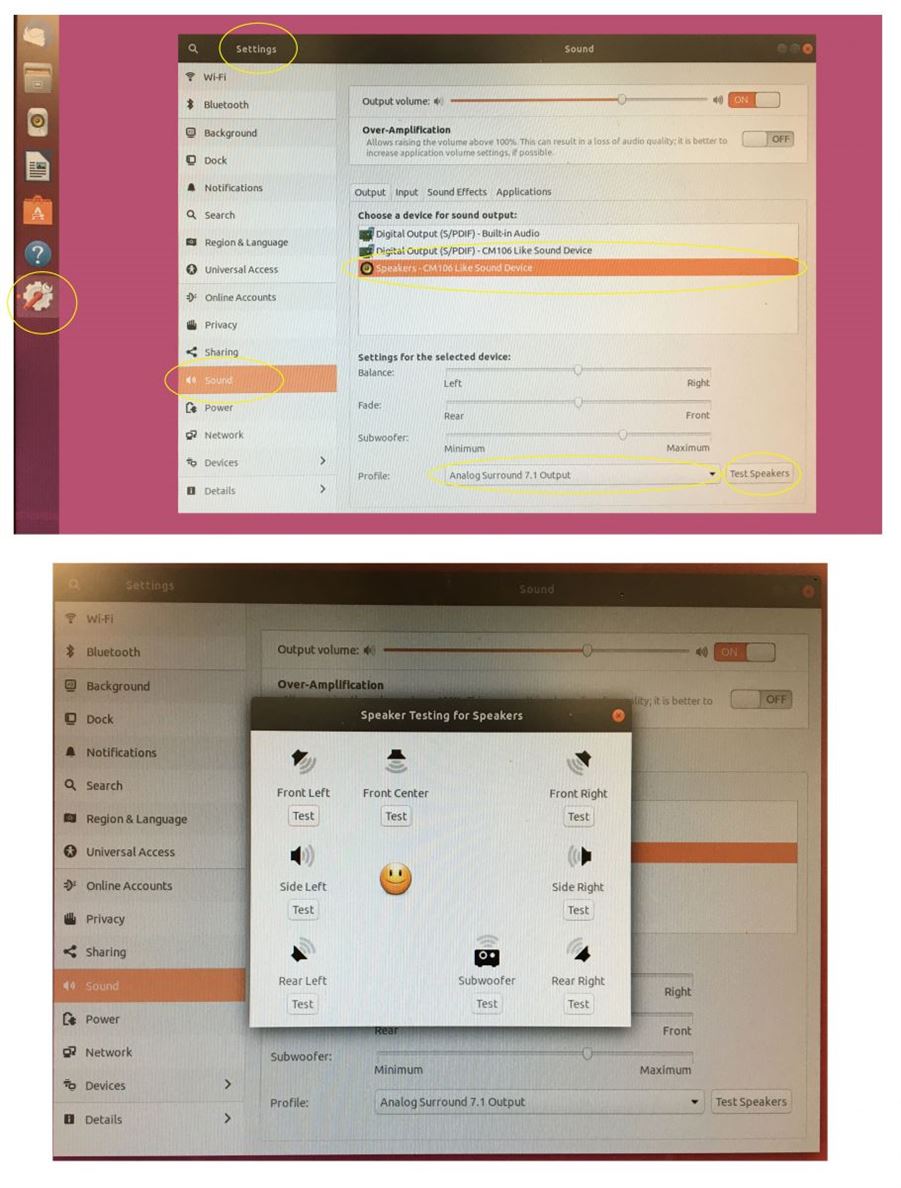
Linux support for this product is using native CM106 sound setting.
Quick Install Guide update for NST-M2STS3-BK [#03172022]
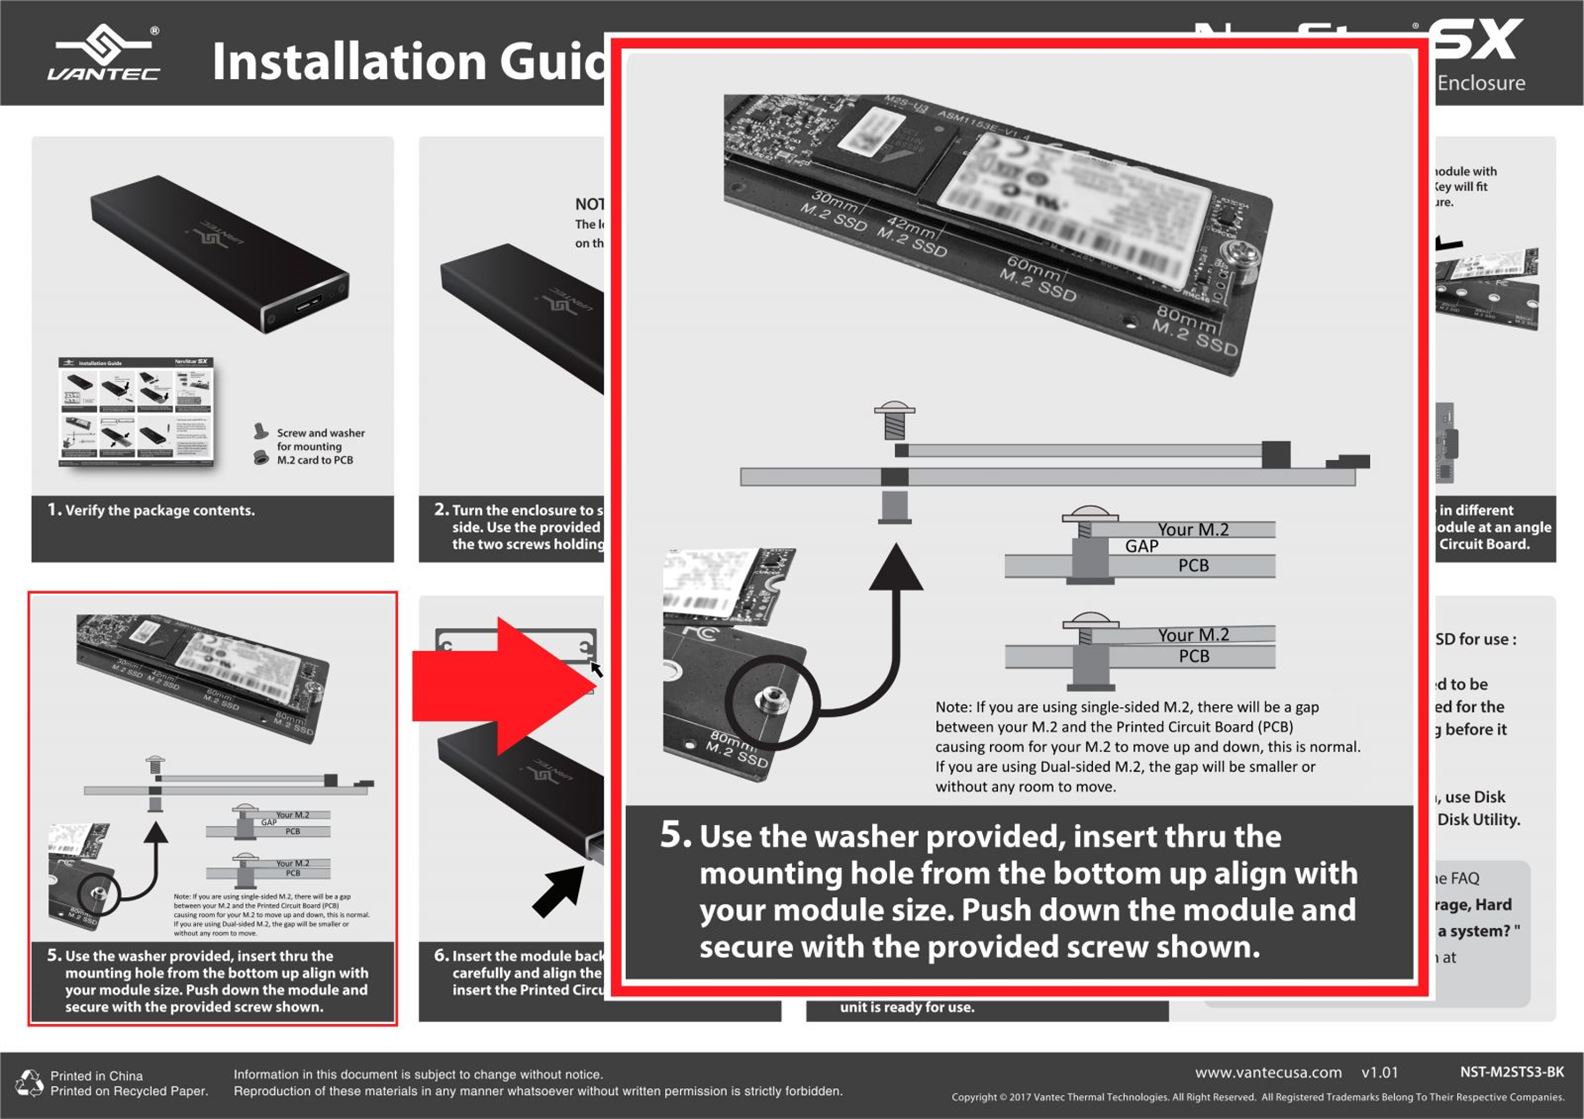
Update to the Quick Installation Guide for mounting M.2
https://www.vantecusa.com/CKEdit/images/UGT-M2STS3-BK_QIG_correction.jpg
NST-536S3-BK Firmware to correct LED not turning off during sleep mode [#06062022].
On some batch of NST-536S3-BK, the LED on the enclsoure is always ON even when system goes to sleep and the enclosure goes to sleep.
This firmware correct the LED not turning OFF when the enclosure goes to sleep.
If you are experiencing this issue, this firmware will correct this problem.
Note: This firmware is for correcting this LED issue only, besides this LED problem, the product is stable and do not require any other correction. If you are not experience this LED issue, DO NOT Flash this firmware.
Warning: Flashing firmware do involve risk of bricking your enclosure, please use with caution and follow the instructions closely.
Here is the link to the firmware:
https://www.vantecusa.com/CKEdit/files/NST-536S3-BK_Firmware_V148-06-00-01_20220506.zip
How to access product: NST-D306WS3 or NST-260WS3 using PC [#02152019]
USE WIFI device without APPS.
EOL no longer has any update to support under the Apps store, but it is still usable via PC using Windows OS, here is how.
First, you can connect using a USB 3.0 cable to your system and still access it like a normal hard drive dock.
Second, via WIFI per below:
The current firmware is 1.1.68, if your device is not running the current version of the firmware, please download the firmware version 1.1.68 from the following link and try updating the firmware.
Unzip and then follow the instruction from the file. There are 3 methods of updating, Use the last method which is the easiest.
https://www.vantecusa.com/CKEdit/images/files/nst-260ws3_ap_firmware1168.zip
After updated, try the following steps in this sequence carefully:
Wired mode using USB connection as a USB storage device:
Wireless mode using Computer (Windows XP/7/8/8.1/10):
Wifi Tether
Try the following steps in this sequence carefully:
Just remember:
+++++++++++++++++++++++++++++++++++++++++++++++++++++++++++++++++++++++++++++++++
Turn ON access to files on Network Devices using SMBv1 in Windows 10
If you have problems with accessing network files, your device may still be using the SMB version 1 protocol, which may have been automatically uninstalled on Windows 10 due to its security concerns. For issues in Windows 10 versions ,please check the Microsoft Support Site. This might be the reason why you can no longer connect to routers, Network-Attached Storage (NAS) via SMB.
Here we provide you a temporary solution which allows you to enable the SMBv1 protocol to regain access to files stored within the network.
If you do not have the direct access to the device running the SMB service, please follow the steps below to temporarily enable the SMBv1 protocol for the purpose of retrieving your files:
Step 1. Open Control Panel in your PC/Notebook.
Step 2. Click on Programs.
Step 3. Click on Turn Windows features on or off link.
Step 4. Expand the SMB 1.0/CIFS File Sharing Support option.
Step 5. Check the SMB 1.0/CIFS Client option.
Step 6. Click the OK button.
Step 7. Click the Restart now button.
After completing the above steps, you will be able to connect to network devices running the SMBv1 protocol on your local network by your Windows 10 computer.
CB-M2SAT-U3 Questions and Answer [#05232023]
Do I need to prep (initialize, partition, and format) a new drive before cloning?
New drives do not need to be prep (initialize, partition, and formatted) if you are cloning them. The Cloning process will copy exactly the info from the source drive.
If you are not cloning and using a new drive, you will need to prep the drive. For Windows OS use Disk Management, for OS X use Disk Utility. See this link here
Do I need to prep (initialize, partition, and format) a new drive before using the drive for Storage (NOT CLONING)?
If you are using this adapter for storage (NOT Clone), AND if the drives are NEW, you will need to prep the new drive before use. Please follow the FAQ on our website for help preparing (initialize, partition, and formatted) the drives. See this link here
There are three interfaces, why can’t I mount 3 drives?
The design of this adapter is for mounting only 2 drives. The M.2 SATA and Standard SATA interface is sharing the same signal; as a result, ONLY 2 drives are allowed to be mounted at one time.
Can I use this adapter as simple storage?
Yes, you can mount and it will see it as an individual drive letter or individual storage device.
Can I RAID them together?
Sorry, you cannot.
What capacity drive can I mount on this adapter?
As of this writing 05/23/2023, It is 16TB for M.2 NVMe and 22TB for Standard 2.5” or 3.5” SATA drive. We are constantly testing new and bigger capacity drives and will update the storage capacity as soon as it is tested. If you have a request, please write to support@vantecusa.com for question about capacity.
What are the LEDs on this adapter?
There are 7 LEDs on the adapter; here are the descriptions of the LEDs.
LEDs - 25%, 50%, 75%, 100%:
These are the status of the Standalone cloning. During the Standalone Cloning process, when it completed 25% of the sectors to sectors cloning, the 25% LED will stay solid. While 50%, 75%, and 100% will continue to flash. This will give you an indication of how much longer it is going to take to finish up to 100%.
LEDs - SATA, NVMe:
The SATA LED is for drive activity for the SATA drive, this can be the M.2 SATA or the 2.5” or 3.5” SATA drive. If there are any read or write operations, the LED will flash.
The NVMe LED is for drive activity for the M.2 NVMe drive. If there are any read or write operations, the LED will flash.
LED – Power:
This LED will be Red if power is connected to the wall outlet, but the power switch on the rear is NOT turned ON. It is safe to mount or dismount drives.
The LED will be White if power is connected to the wall outlet, and the power switch on the rear is turned ON. DO NOT mount or dismount drives since Power is ON, it is NOT Hot Swappable.
How to activate the Cloning process?
First set the CLONE switch (direction of the Cloning) correctly.
Second, Press and hold the CLONE BUTTON until the 25%, 50%, 75%, and 100% LEDs start flashing (about 3 seconds), release the CLONE BUTTON, and press again immediately once to start cloning.
Can I use this adapter to perform a backup?
Yes, this adapter is very good for performing a backup of data from any one of the three storage Interfaces. You can also perform a backup from or to these mounted storage devices.
Do I need to add a heatsink for my M.2 SATA or M.2 NVMe?
It is good to mount a heatsink on your M.2, they generally run hotter due to the high speed of M.2. We design the space around the M.2 NVMe with more space to accommodate a heatsink.
Can I mount my M.2 NVMe or M.2 SATA that already have a heatsink mounted on it?
Check your heatsink mounted M.2 module width, it is likely it will fit and mount correctly. We design the space around the M.2 NVMe with more space to accommodate a heatsink.
You mention this adapter will accommodate newer M.2 modules that support 25mm wide, how is that done?
The current M.2 module are all 22mm wide and the maximum length is 110mm (2242, 2260, 2280, 22110). There is a recent change in the specs for the wider 25mm module. That makes many M.2 enclosures unable to hold these new wider modules. We designed this into the adapter and you can grow with it. This adapter can accommodate M.2 sizes of 2242, 2260, 2280, 22110, 2542, 2560, NEW 2580, and 25110. The maximum M.2 size is 25x110mm.
Can I use the Standalone clone to Clone a Bigger drive to a smaller drive?
Sorry, that is not possible, the design of the Standalone clone is a sector to sector clone, it is not possible to clone more sectors to fewer sectors, but you can use software cloning, software cloning is based on data, not sectors, you will have more flexibility to adjust the cloning function like sizing Partition and cloning only the partition that you like.
Can I clone a boot drive?
Generally, yes, you can if you are using sector to sector or software clone.
Some problem with cloning a Boot drive is when you clone one drive that was linked to a motherboard chipset and clone to a boot drive that uses a PCIe bus to boot. You may have to do some changes to the booting to correct the problem. This is NOT a problem with this adapter cloning design, but everything with YOUR Boot device changing from booting via chipset to booting off PCIe. If you need further help, please write to support@vantecusa.com for more information.
What is the speed of the adapter?
This adapter is capable of USB 3.2 Gen2x1 (10Gbps), speed may vary due to different systems, USB Host, and devices.
Can this adapter be used as a Bus-powered device?
It cannot be used as a Bus-powered device because a 3.5” SATA drive requires 12VDC and that requires an ac adapter. This adapter comes with a good ac adapter that can power any 3.5" SATA drive.
What if I have more questions?
Please write to support@vantecusa.com for further questions and answers.
UGT-CR615 Memory card insertion orientation [#04122023]
UGT-CR940 LED Status and Insertion Orientation [#02162024]
CB-M2NVME-C3 Common Questions
What is the Standalone Clone Speed of this CB-M2NVME-C3?
The Standalone clone speed using a Samsung 970Pro (512GB) M.2 NVMe to a Samsung 970Pro (512GB) M.2 NVMe: 10 minutes.
The Standalone clone speed using a Crucial MX200 M.2 SATA(250GB) SSD to a Samsung 970Pro 512GB M.2 NVMe: 8 minutes.
The Standalone clone speed using a Samsung 840EVO 2.5” SATA (250GB) SSD to a Samsung 970Pro 512GB M.2 NVMe: 8 minutes.
For other clone speeds, you extrapolate the time based on the size. The clone speed is based on the number of sectors on the SOURCE drive and the access read/write speed of the drives.
Firewire drivers on Windows 11 problem - UGT-FW210 [#11132024]
Just to give you some background on Firewire drivers and the driver issue.
Microsoft is the only developer of the Firewire drivers.
Microsoft used to include Firewire drivers native in the OS (XP,7).
Beginning with Windows 8/10/11, Microsoft decided to remove them claiming it is a legacy product, but many users still needed them.
They then put the drivers as a separate download on their website but later totally removed them.
Some computer manufacturers with prebuilt systems + OS do include the legacy Firewire drivers in the system, but some do not.
If your system manufacturer did include them, you just need to install the Firewire card and it will automatically see the card and driver.
If the system manufacturer did not include them for you or if this was your DYI build of the Windows 11 system, it will not have the drivers.
You can get the Microsoft legacy drivers that will work with Windows 11 from our website here but there is a known issue:
https://www.vantecusa.com/CKEdit/images/files/1394_OHCI_LegacyDriver_20200106.zip
Download, unzip to a folder, and run the MSI exe file.
If you are using the earlier version of Windows 11, it will be fine, but later or updated Windows 11 OS may encounter issues with security.
You will get the message that the driver cannot load on this device:
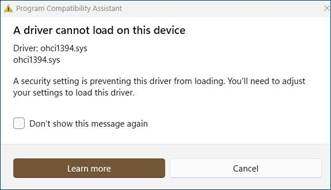
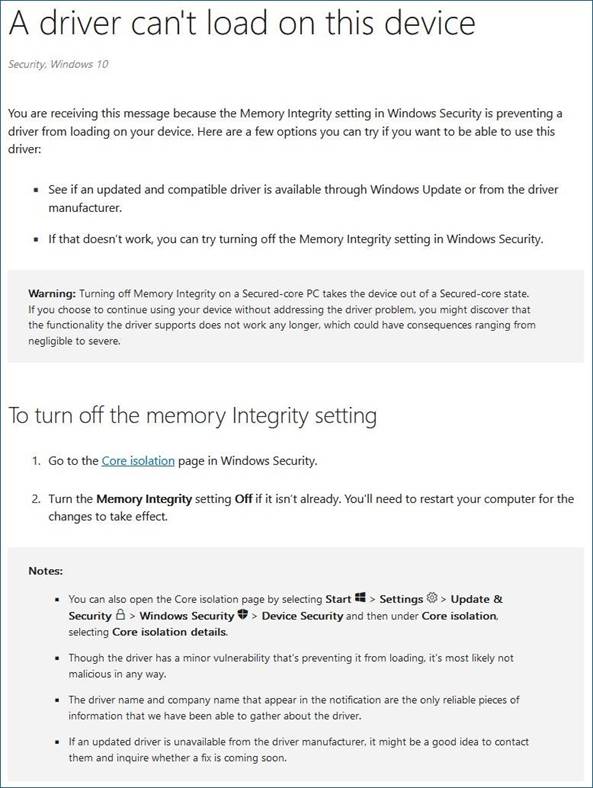
When you click on the “Learn more" button to read about the issue, it references the problem with the Memory Integrity feature.
According to the message, it is best to ask the manufacturer, if there is an updated version of the driver that will be compatible with the Memory Integrity feature. If there is not an updated driver, the only option is to turn off the memory integrity feature. We do not have any updated Firewire driver because the only Firewire driver was developed by Microsoft and only Microsoft can update them.
There is no workaround at this time. This applies to any manufacturer's Firewire card using any Firewire chipset until Microsoft comes out with a fix or workaround. The original drivers are all from Microsoft. No one else does have an alternate Firewire driver. We are also looking forward to Microsoft for an updated driver.
Common Questions for NST-D158C3-BK [#06232025]
Question: In testing the dock by plugging in a drive and turning ON the power, nothing happens, why?
Answer: This is one of the most common questions, this dock like all our products is designed to save energy, when it detects no connection to a working system, it will go into sleep mode and not power ON. The right way to use this dock is to make sure all the necessary cables are connected, your drive is properly and fully inserted into the dock, AND your system is powered ON before turning ON the dock.
DO NOT insert your drive AFTER you have power ON the dock. The right way is to insert the drive(s) Before powering ON the dock.
Question: Are Vantec USB Docks compatible with Windows 11/10 operating system, Mac OS X 10.10 or newer, and the Latest Linux OS?
Answer: Yes, all our USB Enclosures and Docks are compatible with Windows 11/10/8/7 Operating System, Mac OS X 10.10 or newer, and Latest Linux OS. Just plug into any USB port on your system and it should function just like your OS. You do not need to update any firmware or drivers. It is a plug and ready.
Question: Where can I download Drivers for your USB Dock?
Answer: All our USB docks do not need any drivers. It is a plug and ready. All our USB docks use the USB client drivers that are already built into the OS (Windows 7, 8, 8.1, 10, 11, OS X 10.10 or newer, Linux OS). As long as your computer USB Host controller drivers are installed correctly and are working when you connect our docks to your computer, the OS will sense the USB storage and load the correct drivers automatically for you.
Question: What is the Maximum Capacity Hard Drive that can I insert into the Dock and the Power Requirement of the drive?
Answer: As of this writing (June 23, 2025), the maximum capacity for the 3.5" SATA is 30TB or less, and the 2.5" SATA is 16TB or less. We provide an AC adapter that offers 12VDC, 2A. If your drive (info on the drive label) uses more, you will need to get a bigger AC adapter to work correctly. PLEASE CHECK WITH VANTEC SUPPORT BEFORE YOU TRY TO USE A BIGGER AC ADAPTER. WRONG SIZE AC ADAPTER WILL DAMAGE YOUR DRIVE AND THE DOCK, ANY NEWER AC ADAPTER MUST BE 12VDC. Often what we provide is enough and you do not need a bigger AC adapter. If you are not sure please ask, please contact support@vantecusa.com for help. We do not want you to damage the dock or your hard drive by getting the wrong AC adapter.
Question: The Product is not working correctly, what should I do?
Answer: Sometimes problems may occur during initial installation or use, we at VantecUSA like to help you get it working to resolve the problem. We have a team of support staff that is here to help you. Please write to us first before you return the product to the place of purchase. We are committed to helping you get the product set up and working correctly. You can reach us via email at support@vantecusa.com. We will reply to you very quickly to assist you.
Question: I follow the steps to mount and connect my hard drive but I still cannot see the drive in my File Explorer, what do I need to do to see it correctly in File Explorer?
Answer: This is a very common question. Here are some reasons why it is not seeing the drive in File Explorer.
Question: How to use C to C/A USB cable on this dock?
Answer: The design of this Dock is using the USB C port on the back, plug the single USB C into the dock first
and the other with the C/A to your system. If your system is using USB C, just plug the USB C into your system, or if your system has a USB Type-A port, just plug the C to A adapter into the USB C port and then connect to your system.
Question: I lost my AC adapter for this Dock, what size of an AC adapter do I need?
Answer: This NST-D158C3-BK dock comes with a 12VDC, 2A AC adapter. If you need to purchase a replacement AC adapter, you can just search online (google search) for them or the local store should have them too. The Specs for the AC adapter are 12VDC, 2A, center pin positive, plug size Outer Dia: 5.5mm, Inner Dia: 2.1mm, Depth(length): 10mm. If you are planning to get one online, it is good also to make sure there are all the safety certifications on the AC adapter like UL, FCC, CE, for home use, and more. Not all AC adapters are made the same, I would suggest a similar AC adapter. If you are not sure please ask, please contact support@vantecusa.com for help. We do not want you to damage the dock or your hard drive by getting the wrong AC adapter.
Question: How to disconnect or remove the dock?
Answer: There are a few ways of doing it, but here is the right way so that it will not cause a problem with the data on your drive. If you are using Windows OS, select eject(safe to remove) on the taskbar USB icon (right corner of your screen), click on the USB icon, and select the dock drive to remove or eject. Wait for the system to respond with a “safe to remove” message. Once you see the message, you can turn off the power via the power switch on the back of the dock.
To Swap to a different hard drive, do the same above, and after powering off, swap the hard drive and power it back on and you are ready to use it again.
What is the function of the switching setting on Caddy model MRK-HC127A-BK or MRK-HC95A-BK? [#33411]
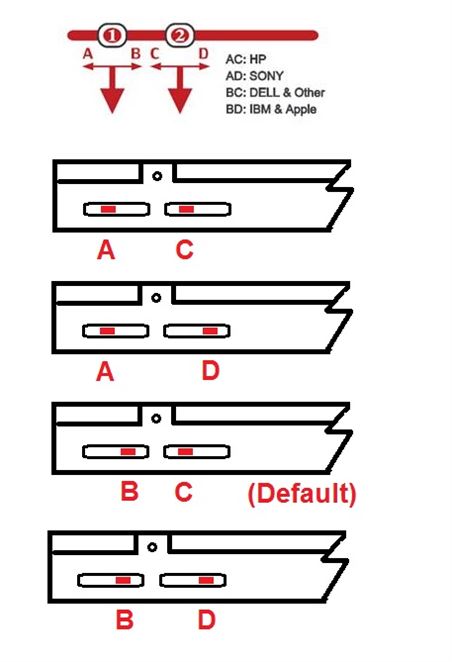
The switch is to correct compatibility issue with some brand of laptop computer. The default is BC position. BC position will work with 99.9% of laptop, there are no need to change the setting.
After installing, if you can see the drive in the BIOS and cannot see it in the OS physical disk. You can try changing the setting. By changing the setting, it will not harm your system or drive.
What is the purpose of a USB cable with a Y connector? [#33416]
What is the purpose of a USB cable with a Y connector?
If a user connects a device (like a small portable external hard drive enclosure) to a USB port on a computer system, this device is drawing power from the USB port to power the device. If the device draws too much power from the port and the port cannot provide enough power to the device, the device may not work correctly or may exhibit symptoms like random disconnection, device/drive clicking noise, device not detected, file transfer problem, device will not spin up and more.
One way to provide more power to the device is to use another USB port to help supplement the needed power for the device.
What we have done is use a regular USB cable and adds another USB connector to the end that plugs into your system. It looks like a Y cable. The two tip of the “Y” are the two type A USB connector connecting to two USB port on your system and the other end to the device (enclosure). You will notice on the Y cable, one of the type A connector will have a cable that is thinner, that is the supplemental USB power connector.
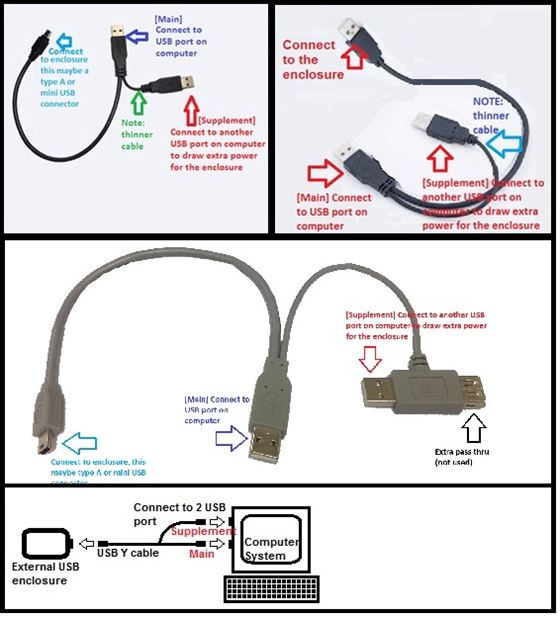
HOW TO USE THE Y CABLE
First connect the connector to the enclosure then the thick cable with the USB header to your system. If you notice problem symptom listed above, please connect the supplemental USB connector to another USB port on your computer.
QUESTIONS:
Q: If I am using USB 3.0 device and port on my system, why do I still need a USB Y cable, since I know my single USB 3.0 port do provide enough power for my external drive?
A: The USB 3.0 Y cable actually serve two purposes, if you are using it with a USB 3.0 port on the system, you will only need a single port or connector. You do not need to use the supplemental USB connector. If you do not have access to a USB 3.0 port, this USB 3.0 Y cable will function just like a USB 2.0 Y cable and allows you to connect your external drive to the USB 2.0 port on a non USB 3.0 system and still have access to you data.
Q: Will using both connectors on the Y cable overload and hurt my drive?
A: No, it will not. It is safe to use with both connectors.
Q: Can I use only the thinner cable?
A: No, the thinner supplemental connector is only for power and will not provide any data signal.
Q: I am connecting my external enclosure using eSATA connection and I also need to use both USB connectors of the Y cable?
A: You MAY need to use it IF the external enclosure draws too much power from one port. By using the main with the supplemental connector, it will have enough power to power the device correctly
NexStar External 2.5" enclosure [#33417]
Q: Why can't my computer detect the 2.5" enclosure after install a drive into the enclosure?
A: If you are using USB 2.0 port on your system or USB 2.0 enclosure, try using both USB connection to your system with the provided USB Y cable. Some hard drive power requirement may exceed what 1 USB port can provide as a result it can cause problem. For all 2.5" hard drive enclosure, we provide a USB cable that have a Y connector. This extra USB connector will help supplement the power so that the hard drive can work correctly. To read more about the USB Y cable, check out the FAQ on "What is the purpose of a USB cable with a Y connector?"
Q: When I install a NEW hard in to a 2.5" enclosure, I cannot see it in Windows Explorer (Windows OS) or Desktop (OS X), what is going on?
A: All new drive install need to be setup for use. This process involve initializing, partitioning and formatting the new drive. Please look at the FAQ on "How to Preparing A New Hard Drive For Use with a system"
Q: I took a OLD hard drive from another enclosure and install into this Vantec enclosure but I cannot see my DATA, what is going on?
A: The drive taken out of the other enclosure may be formatted differently as a result it will not see your data. All Vantec enclosures are using the standard OS formatting. Other reason could be the drive that was taken out of the other enclosure file system was corrupted. You can use a data recovery program to recover your data.
Other option:
1) connect back to your old enclosure and backup the data to other location.
2) install into the Vantec enclosure and using the OS to clean the drive using initialize, partition, and format the drive to work correctly in our enclosure.
3) restore the data back to the Vantec enclosure.
Q: I have other questions that is not listed here, what can I do?
A: If you are located in the USA/Canada, you can email our support representative using the Contact Us section of the website for further assistance.
No support for Windows 10 for UGT-ST310R Host Controller [#06252019]
There are not support for Windows 10 using this card.
Drivers available for Windows 8.1 or older only.
Getting started with Smoovie model PVS-100 [#33414]